<?xml version="1.0" encoding="utf-8"?><feed xmlns="http://www.w3.org/2005/Atom" ><generator uri="https://jekyllrb.com/" version="3.10.0">Jekyll</generator><link href="https://wells.ee/feed.xml" rel="self" type="application/atom+xml" /><link href="https://wells.ee/" rel="alternate" type="text/html" /><updated>2026-07-22T18:48:50+00:00</updated><id>https://wells.ee/feed.xml</id><title type="html">Wells Riley | Journal</title><subtitle>Wells Riley makes things — build videos, hardware, software, and a shop.</subtitle><author><name>Wells Riley</name></author><entry><title type="html">Bypassing the AT&amp;amp;T Fiber modem with a UniFi Dream Machine Pro</title><link href="https://wells.ee/journal/2020-08-05-bypassing-att-fiber-modem-udmp/" rel="alternate" type="text/html" title="Bypassing the AT&amp;amp;T Fiber modem with a UniFi Dream Machine Pro" /><published>2020-08-05T00:00:00+00:00</published><updated>2020-08-05T00:00:00+00:00</updated><id>https://wells.ee/journal/bypassing-att-fiber-modem-udmp</id><content type="html" xml:base="https://wells.ee/journal/2020-08-05-bypassing-att-fiber-modem-udmp/"><![CDATA[<p><em>As an eBay Partner, I may be compensated if you make a purchase.</em></p>

<p>A few months ago I wrote a guide to <a href="/journal/2020-03-01-bypassing-att-fiber-modem-unifi-usg">bypassing the AT&amp;T fiber modem using a UniFi USG</a>, and I’ve since upgraded to the <a href="https://amzn.to/3gjhyDi">UniFi Dream Machine Pro</a> and wanted to write an updated guide since the process is a bit different.
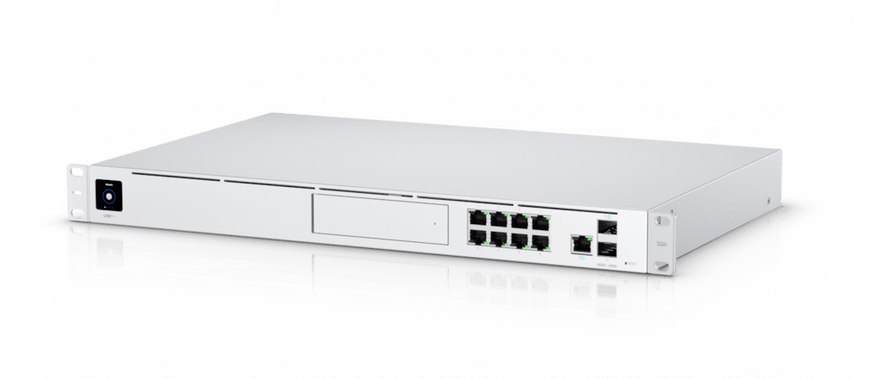
<a href="https://amzn.to/3gjhyDi"><img src="/images/2020-08-05-bypassing-att-fiber-modem-udmp/udmp.png" alt="unifi dream machine pro" /></a></p>

<p>To recap, the AT&amp;T router/gateway has <em>no true bridge mode</em>, so it’s incompatible with the UDM Pro’s DHCP and my current home network. I’d end up in a double NAT situation unless I let AT&amp;T’s modem handle everything like DHCP, firewall, port forwarding, etc. Not ideal!</p>

<p>Unfortunately the RG (that’s what AT&amp;T calls the modem) authenticates with the AT&amp;T fiber network with a special hard-coded certificate unique to each modem, so you can’t just throw the RG into a bin and plug your USG directly into the fiber ONT. It’ll fail the handshake and never go online. Unless you follow this guide. 🙂</p>

<p>The steps for the <a href="https://amzn.to/3gjhyDi">UDM Pro</a> and the <a href="https://www.amazon.com/gp/product/B00LV8YZLK/ref=as_li_tl?ie=UTF8&amp;camp=1789&amp;creative=9325&amp;creativeASIN=B00LV8YZLK&amp;linkCode=as2&amp;tag=wr088e-20&amp;linkId=6bb638983409338c6869bad49d28dfe2">USG</a> are slightly different, so here’s my new guide that I’ve cobbled together from other online sources.</p>

<h3 id="before-you-start">Before you start</h3>

<p>First we need a rooted NVG589 modem. AT&amp;T may not have supplied you with this model (I was given a Pace 5268AC), but they can be <a href="https://www.ebay.com/sch/11176/i.html?_nkw=NVG589&amp;mkcid=1&amp;mkrid=711-53200-19255-0&amp;siteid=0&amp;campid=5338674798&amp;customid=&amp;toolid=10001&amp;mkevt=1">found on eBay</a> sometimes. <a href="http://earlz.net/view/2012/06/07/0026/rooting-the-nvg510-from-the-webui">Follow this guide</a> that details rooting the device and extracting the needed certificate files.</p>

<p>OR you can do what I did and <em>purchase</em> the rooted files. For about $40 I was able to instantly move to the next step without waiting for a modem to ship and bumbling through rooting the device. A seller called <a href="https://www.ebay.com/sch/maczrool/m.html?_nkw=&amp;_armrs=1&amp;_ipg=&amp;_from=&amp;mkcid=1&amp;mkrid=711-53200-19255-0&amp;siteid=0&amp;campid=5338674798&amp;customid=&amp;toolid=10001&amp;mkevt=1">maczrool on eBay sells unique rooted certificates</a> and seems to have a lot of them.</p>
<aside class="info"><strong>Note:</strong> I am in no way affiliated with this person, aside from being a happy customer.</aside>

<p>In order to move forward you need the following files from your rooted RG (or eBay):</p>

<ul>
  <li>CA_XXXXXX-XXXXXXXXXXXXXX.pem</li>
  <li>Client_XXXXXX-XXXXXXXXXXXXXX.pem</li>
  <li>PrivateKey_PKCS1_XXXXXX-XXXXXXXXXXXXXX.pem</li>
  <li>wpa_supplicant.conf</li>
  <li>The MAC address of the rooted device (printed on the back of the RG, or included with the files from eBay)</li>
  <li>The IP address, username, and password of your UniFi controller. In this guide I’m using <code class="language-plaintext highlighter-rouge">10.0.1.5</code> for the IP and <code class="language-plaintext highlighter-rouge">admin</code> for the username.</li>
</ul>

<aside class="info"><strong>Note:</strong> If you instead have .der and mfg.dat files, follow <a href="https://www.devicelocksmith.com/2018/12/eap-tls-credentials-decoder-for-nvg-and.html" target="_blank">this guide</a> to decode them to obtain your .pem and wpa_supplicant.conf files.</aside>

<h3 id="instructions">Instructions</h3>

<h4 id="step-1">Step 1</h4>

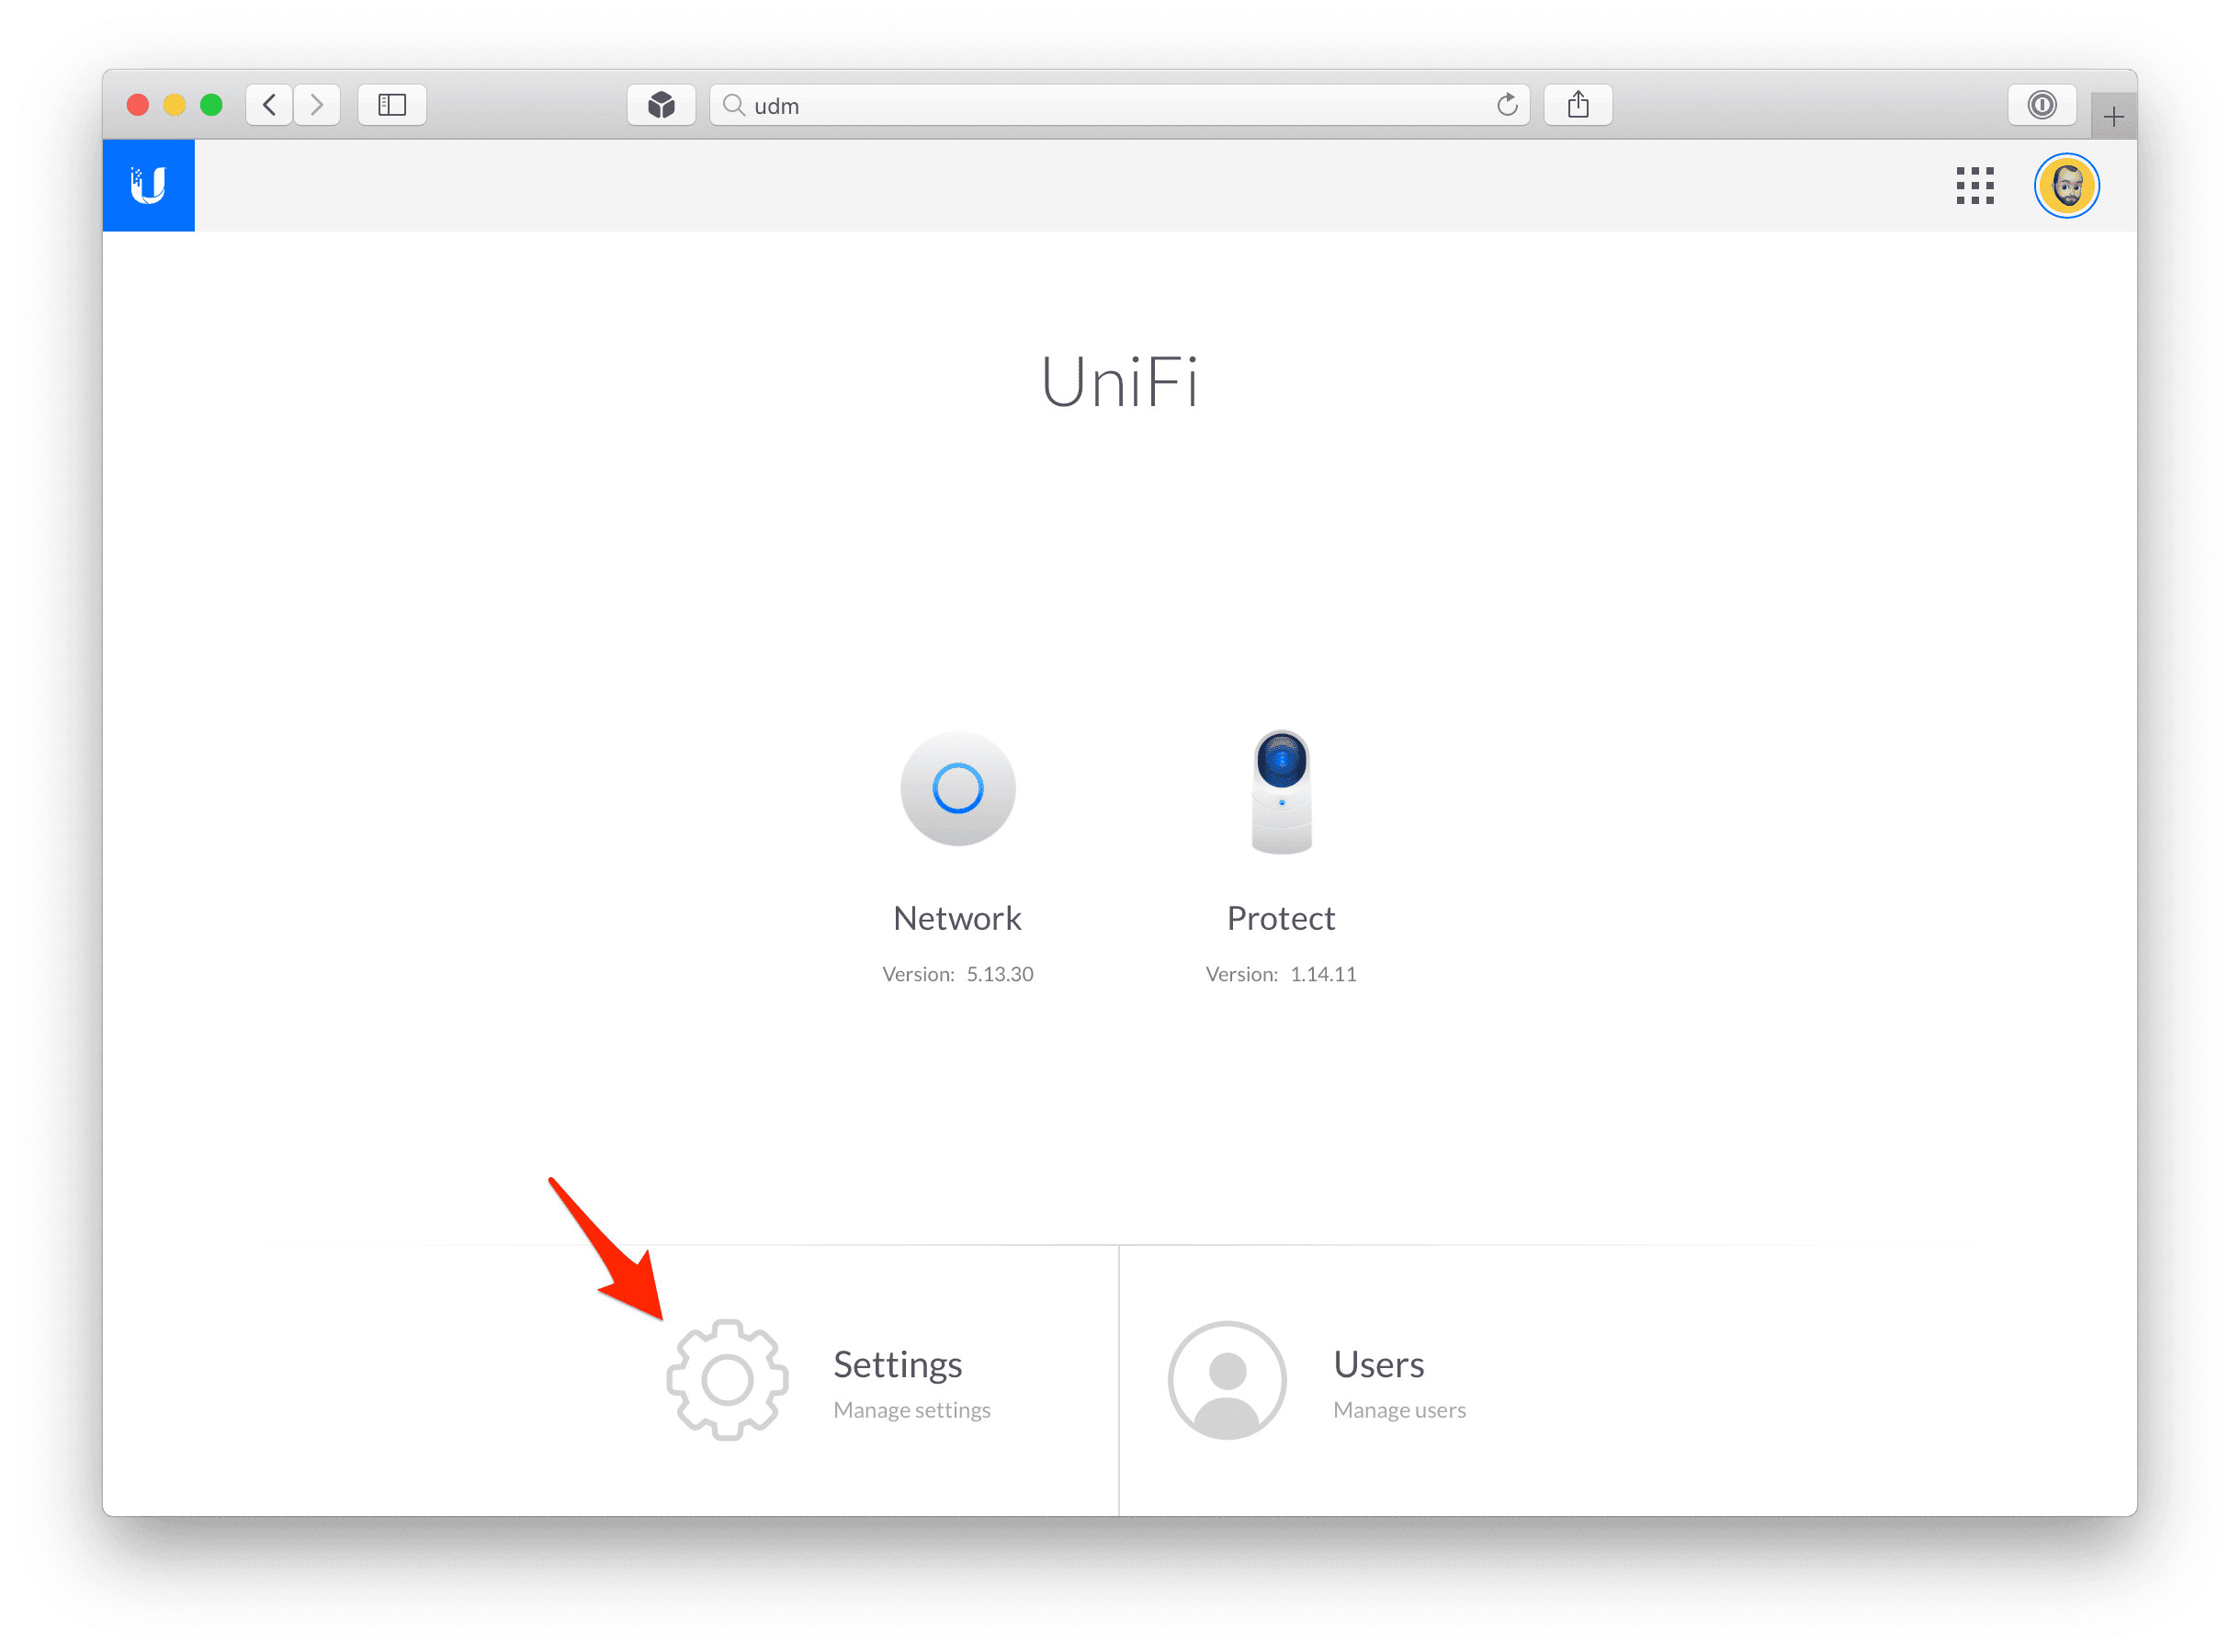
<p>First we need to enable SSH access to the UDMP (UniFi Dream Machine Pro), which is configured differently from other UniFi products.</p>

<p><img src="/images/2020-08-05-bypassing-att-fiber-modem-udmp/ssh-1.png" alt="ssh step 1" /></p>

<p>First navigate to the IP or hostname of your UDMP (ex: 192.168.1.1)</p>

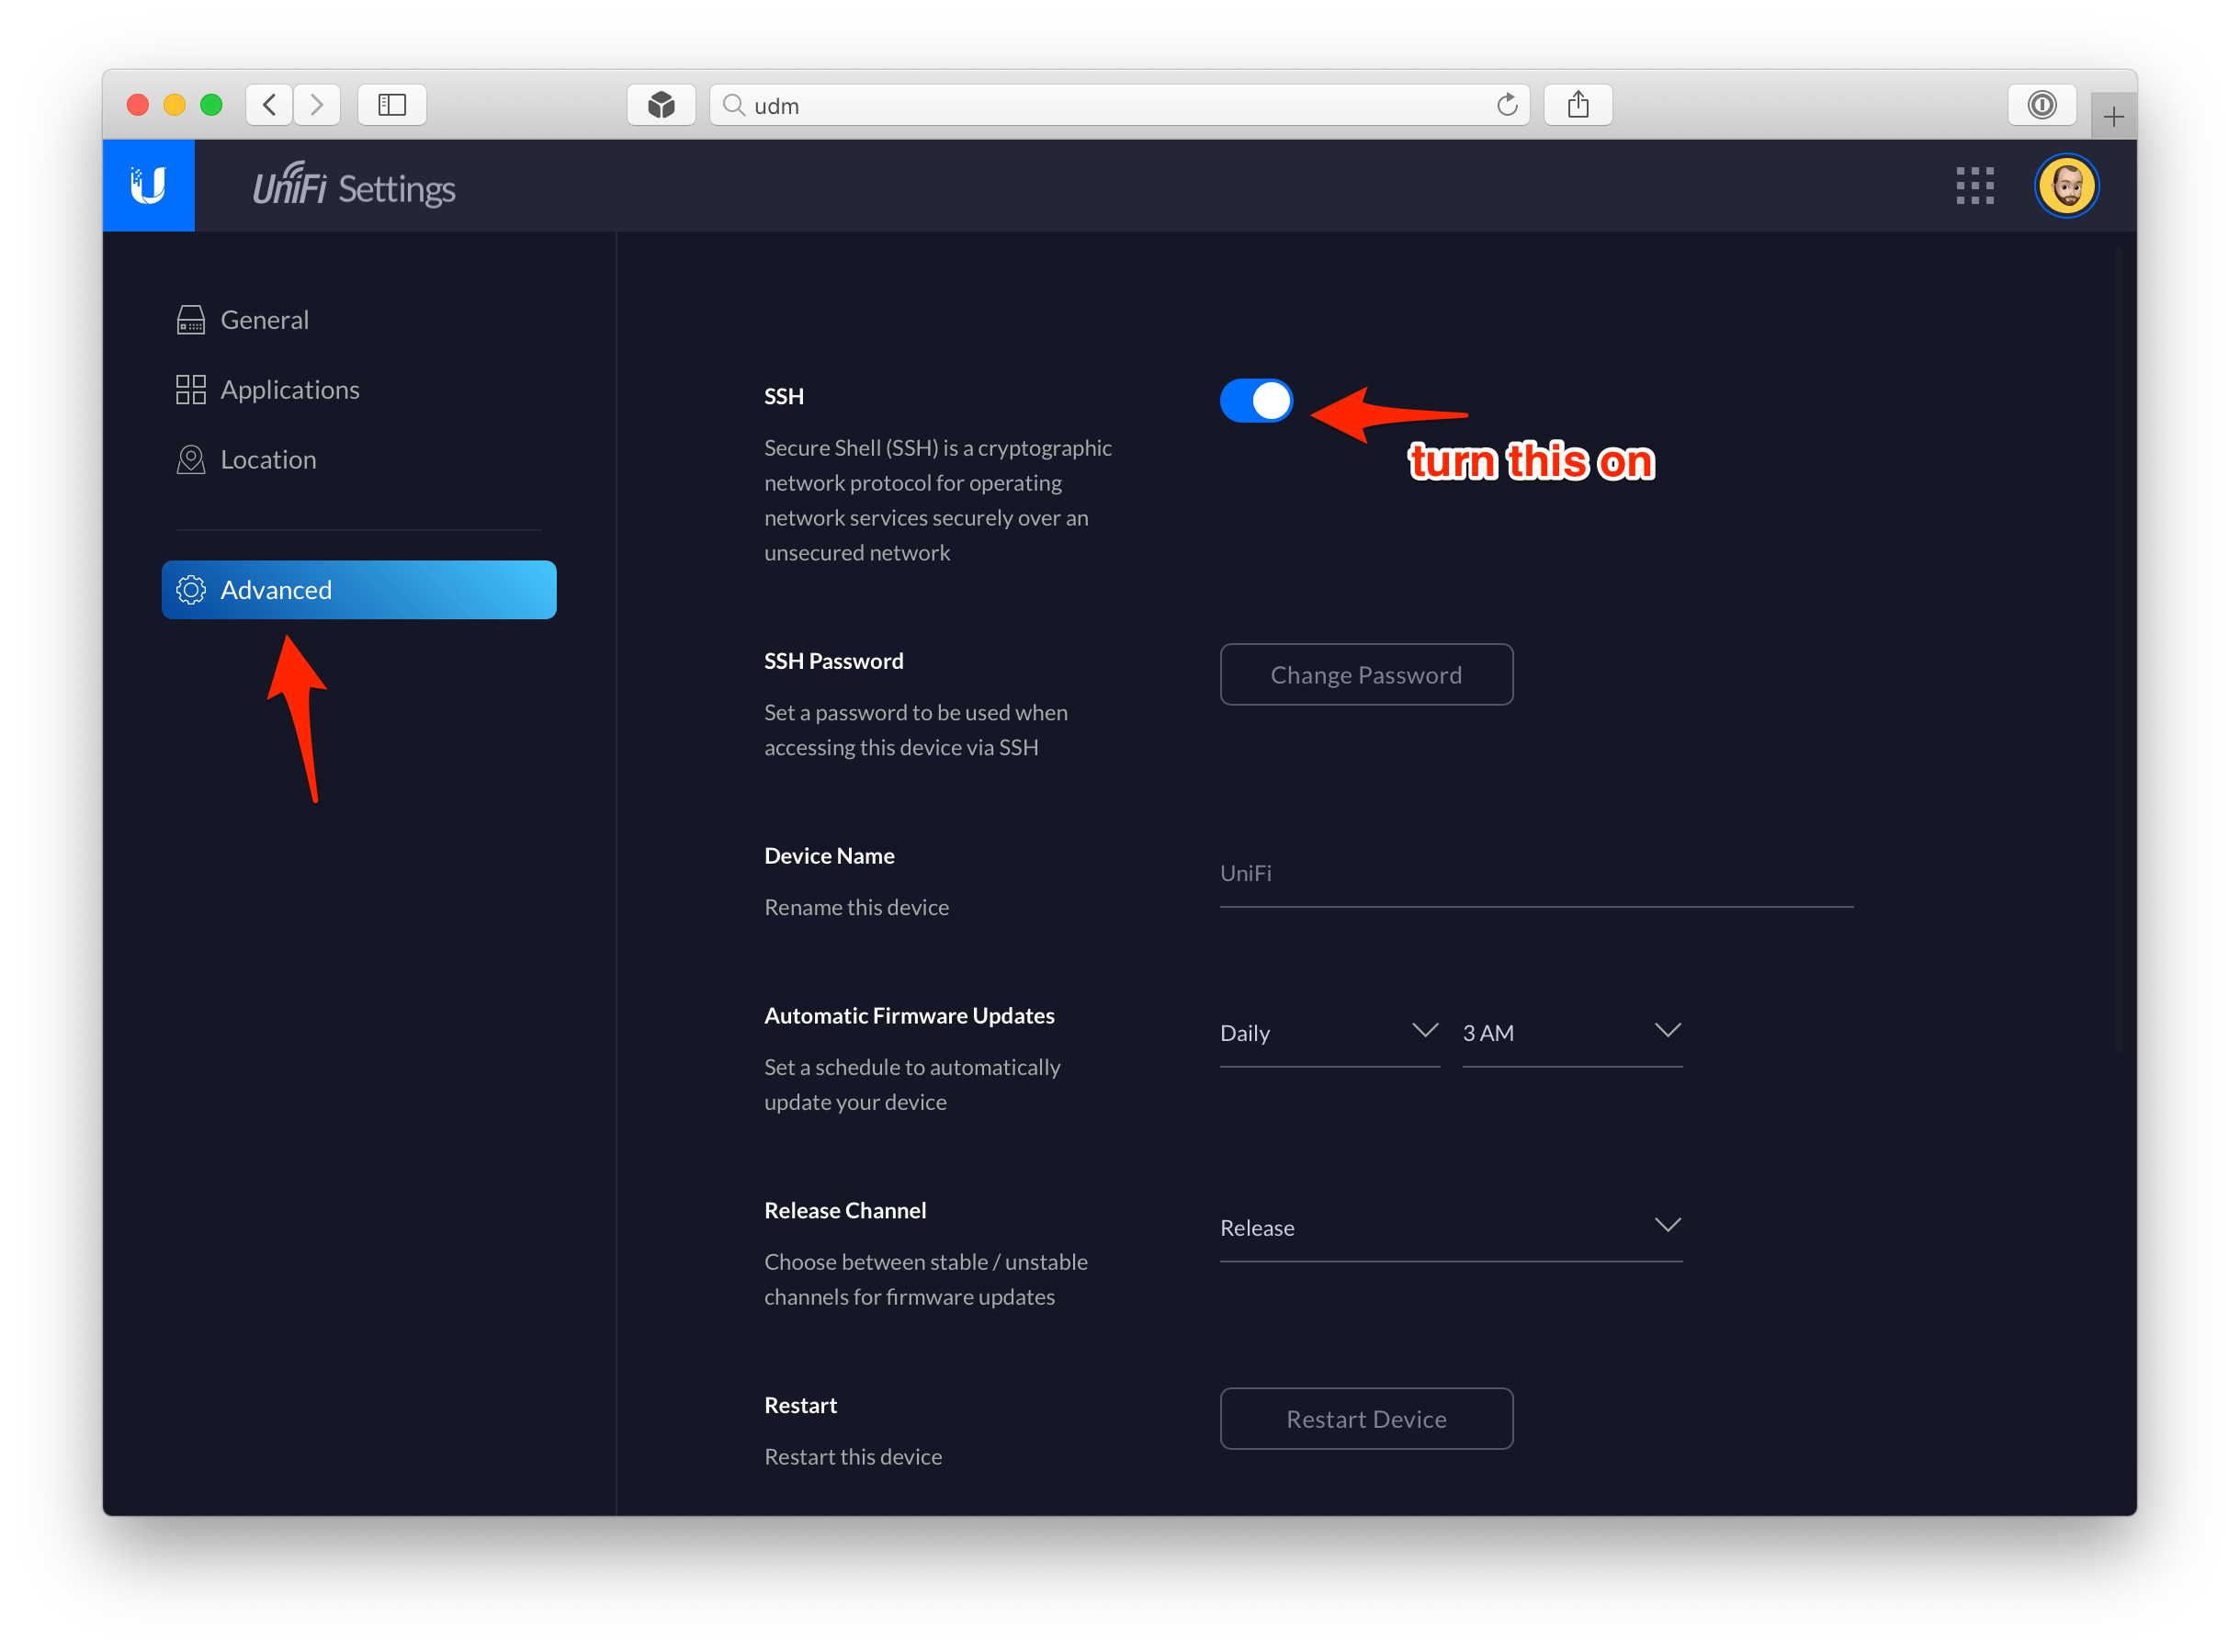
<p><img src="/images/2020-08-05-bypassing-att-fiber-modem-udmp/ssh-2.png" alt="ssh step 2" /></p>

<p>Then go to <strong>Advanced</strong> and toggle <strong>SSH</strong> on. You will also need to set a SSH password, so do that next and hit <strong>Confirm</strong>.</p>

<h4 id="step-2">Step 2</h4>

<p>Open a terminal window and copy your 4 certificate files to the UDMP. Replace <code class="language-plaintext highlighter-rouge">192.168.1.1</code> with your UDMP’s IP address. Your username is <code class="language-plaintext highlighter-rouge">root</code> and the password is the password you set in Step 1.</p>

<div class="language-shell highlighter-rouge"><div class="highlight"><pre class="highlight"><code><span class="c"># switch to the directory where you saved your files</span>
<span class="nv">$ </span><span class="nb">cd</span> /path/to/<span class="k">*</span>.pem
<span class="c"># copy the PEM files to the UDMP using SCP</span>
<span class="nv">$ </span>scp ./<span class="k">*</span>.pem root@192.168.1.1:/tmp/
<span class="c"># copy wpa_supplicant.conf to the UDMP using SCP</span>
<span class="nv">$ </span>scp ./wpa_supplicant.conf root@192.168.1.1:/tmp/
</code></pre></div></div>

<p>Next SSH into your UDMP, and move the files to their final place.</p>

<div class="language-shell highlighter-rouge"><div class="highlight"><pre class="highlight"><code><span class="c"># ssh into the UDMP</span>
<span class="nv">$ </span>ssh root@192.168.1.1
<span class="c"># create the certificate directory</span>
<span class="nb">mkdir</span> /mnt/data/podman/wpa_supplicant/
<span class="c"># copy files into the new directory</span>
<span class="nv">$ </span><span class="nb">cp</span> <span class="nt">-arfv</span> /tmp/<span class="k">*</span>pem /tmp/wpa_supplicant.conf /mnt/data/podman/wpa_supplicant/
</code></pre></div></div>

<aside class="info"><strong>Note:</strong> <em>Podman</em> is a container management tool for Docker. If you’re not familiar with it (or Docker), don’t worry. This guide is pretty much entirely copy and paste.</aside>

<h4 id="step-3">Step 3</h4>

<p>We need to modify the <code class="language-plaintext highlighter-rouge">wpa_supplicant.conf</code> file with the correct file paths of your <code class="language-plaintext highlighter-rouge">.pem</code> certificate files. <strong>Run each of these commands only once!</strong></p>

<div class="language-shell highlighter-rouge"><div class="highlight"><pre class="highlight"><code><span class="nv">$ </span><span class="nb">sed</span> <span class="nt">-i</span> <span class="s1">'s,ca_cert=",ca_cert="/etc/wpa_supplicant/conf/,g'</span> /mnt/data/podman/wpa_supplicant/wpa_supplicant.conf
<span class="nv">$ </span><span class="nb">sed</span> <span class="nt">-i</span> <span class="s1">'s,client_cert=",client_cert="/etc/wpa_supplicant/conf/,g'</span> /mnt/data/podman/wpa_supplicant/wpa_supplicant.conf
<span class="nv">$ </span><span class="nb">sed</span> <span class="nt">-i</span> <span class="s1">'s,private_key=",private_key="/etc/wpa_supplicant/conf/,g'</span> /mnt/data/podman/wpa_supplicant/wpa_supplicant.conf
</code></pre></div></div>

<h4 id="step-4">Step 4</h4>

<p>We need to install the <a href="https://github.com/pbrah/wpa_supplicant-udmpro">wpa_supplicant-udmpro</a> Docker image by <a href="https://github.com/pbrah">pbrah</a>, which will authenticate requests to the AT&amp;T fiber network. There are instructions in the GitHub repo, and I am reproducing them here with some added detail.</p>

<p><strong>Assuming your UDMP is connected to the internet via the RG</strong> and that <strong>your RG is attached to Port 8</strong> (the ethernet WAN port, not the SFP+ port), run this command to download the Docker image:</p>

<div class="language-shell highlighter-rouge"><div class="highlight"><pre class="highlight"><code><span class="nv">$ </span>podman run <span class="nt">--privileged</span> <span class="nt">--network</span><span class="o">=</span>host <span class="nt">--name</span><span class="o">=</span>wpa_supplicant-udmpro <span class="nt">-v</span> /mnt/data/podman/wpa_supplicant/:/etc/wpa_supplicant/conf/ <span class="nt">--log-driver</span><span class="o">=</span>k8s-file <span class="nt">--restart</span> always <span class="nt">-d</span> <span class="nt">-ti</span> pbrah/wpa_supplicant-udmpro:v1.0 <span class="nt">-Dwired</span> <span class="nt">-ieth8</span> <span class="nt">-c</span>/etc/wpa_supplicant/conf/wpa_supplicant.conf
</code></pre></div></div>

<p><strong>Only</strong> if your RG is attached to Port 10 (the SFP+ WAN port) run this command instead:</p>

<div class="language-shell highlighter-rouge"><div class="highlight"><pre class="highlight"><code><span class="nv">$ </span>podman run <span class="nt">--privileged</span> <span class="nt">--network</span><span class="o">=</span>host <span class="nt">--name</span><span class="o">=</span>wpa_supplicant-udmpro <span class="nt">-v</span> /mnt/data/podman/wpa_supplicant/:/etc/wpa_supplicant/conf/ <span class="nt">--log-driver</span><span class="o">=</span>k8s-file <span class="nt">--restart</span> always <span class="nt">-d</span> <span class="nt">-ti</span> pbrah/wpa_supplicant-udmpro:v1.0 <span class="nt">-Dwired</span> <span class="nt">-ieth10</span> <span class="nt">-c</span>/etc/wpa_supplicant/conf/wpa_supplicant.conf
</code></pre></div></div>

<h4 id="step-5">Step 5</h4>

<p>We’re in the home stretch! We need to make sure the Docker image runs every time the UDMP is rebooted. Fortunately there’s a <a href="https://github.com/boostchicken/udm-utilities/tree/master/on-boot-script">UDMP Boot Script</a> on GitHub that we can use for exactly this purpose.</p>

<p>SSH into the UDMP and download the script:</p>

<div class="language-shell highlighter-rouge"><div class="highlight"><pre class="highlight"><code><span class="c"># SSH into your UDM</span>
<span class="nv">$ </span>ssh root@192.168.1.1
<span class="c"># start UniFi OS shell</span>
<span class="nv">$ </span>unifi-os shell
<span class="c"># download udm-boot_1.0.1-1_all.deb and install it</span>
<span class="nv">$ </span>curl <span class="nt">-L</span> https://udm-boot.boostchicken.dev <span class="nt">-o</span> udm-boot_1.0.4_all.deb
<span class="nv">$ </span>dpkg <span class="nt">-i</span> udm-boot_1.0.4_all.deb
<span class="nv">$ </span><span class="nb">exit</span>
</code></pre></div></div>

<p>We need to create a small shell script to finish up.</p>

<div class="language-shell highlighter-rouge"><div class="highlight"><pre class="highlight"><code><span class="nv">$ </span>nano /mnt/data/on_boot.d/10-wpa_supplicant.sh
</code></pre></div></div>

<p>Copy and paste this snippet into nano:</p>

<div class="language-shell highlighter-rouge"><div class="highlight"><pre class="highlight"><code><span class="c">#!/bin/sh</span>

podman start wpa_supplicant-udmpro
</code></pre></div></div>

<p>then press <span class="keyboard">Ctrl</span> <span class="keyboard">O</span> then <span class="keyboard">Ctrl</span> <span class="keyboard">X</span> to save and close.</p>

<p>We need to make the script we just created executable, too.</p>

<div class="language-shell highlighter-rouge"><div class="highlight"><pre class="highlight"><code><span class="nb">chmod</span> +x /mnt/data/on_boot.d/10-wpa_supplicant.sh
</code></pre></div></div>

<h4 id="step-6">Step 6</h4>

<p>Now reboot your UDMP and plug the ethernet cable from your fiber ONT directly into the WAN port of your UDMP. It’ll take a few minutes to boot up. Once it’s back online, you should have internet connectivity! You can also check it’s working by SSHing back into the UDM and viewing the Docker logs:</p>

<div class="language-shell highlighter-rouge"><div class="highlight"><pre class="highlight"><code><span class="nv">$ </span>ssh root@192.168.1.1
<span class="nv">$ </span>podman logs <span class="nt">-f</span> wpa_supplicant-udmpro
</code></pre></div></div>

<p>If you see output like this, then it’s definitely working!</p>

<div class="language-shell highlighter-rouge"><div class="highlight"><pre class="highlight"><code>...
eth8: CTRL-EVENT-EAP-PEER-CERT <span class="nv">depth</span><span class="o">=</span>0 <span class="nv">subject</span><span class="o">=</span><span class="s1">'/C=US/ST=Michigan/L=Southfield/O=ATT Services Inc/OU=OCATS/CN=aut03pltnca.pltnca.sbcglobal.net'</span> <span class="nb">hash</span><span class="o">=</span>XXXXXXXXXXXXXXXXXXXXXXXXXXXXXXXXXXXXXXXXXXXXXXXXXXXXXXXXXXXXXXXX
eth8: CTRL-EVENT-EAP-PEER-ALT <span class="nv">depth</span><span class="o">=</span>0 DNS:aut03pltnca.pltnca.sbcglobal.net
eth8: CTRL-EVENT-EAP-SUCCESS EAP authentication completed successfully
...
</code></pre></div></div>

<p>Press <span class="keyboard">Ctrl</span> <span class="keyboard">C</span> to close the log viewer.</p>

<h2 id="additional-resources">Additional resources</h2>

<ul>
  <li>I also have a guide for <a href="/journal/2020-03-01-bypassing-att-fiber-modem-unifi-usg/">doing this on the UniFi USG</a></li>
  <li><a href="https://github.com/pbrah/wpa_supplicant-udmpro">wpa_supplicant-udmpro</a> and <a href="https://github.com/boostchicken/udm-utilities/tree/master/on-boot-script">udm-utilities</a> on GitHub - most of this guide is adapted from their great work!</li>
  <li><a href="https://github.com/bypassrg/att">Guide for rooting NVG510 and NVG589</a></li>
  <li><a href="https://www.ebay.com/sch/maczrool/m.html?_nkw=&amp;_armrs=1&amp;_ipg=&amp;_from=&amp;mkcid=1&amp;mkrid=711-53200-19255-0&amp;siteid=0&amp;campid=5338674798&amp;customid=&amp;toolid=10001&amp;mkevt=1">maczrool on eBay</a> (I bought my certs from him)</li>
</ul>]]></content><author><name>Wells Riley</name></author><category term="homelab" /><category term="guide" /><summary type="html"><![CDATA[Connect your UniFi Dream Machine Pro directly to your AT&T Fiber optical terminal for true bridge mode--and ditch the huge AT&T modem.]]></summary><media:thumbnail xmlns:media="http://search.yahoo.com/mrss/" url="https://wells.ee/images/2020-08-05-bypassing-att-fiber-modem-udmp/og.jpg" /><media:content medium="image" url="https://wells.ee/images/2020-08-05-bypassing-att-fiber-modem-udmp/og.jpg" xmlns:media="http://search.yahoo.com/mrss/" /></entry><entry><title type="html">Pushing the limits of 1Blocker custom rules</title><link href="https://wells.ee/journal/2020-04-18-1blocker-custom-rules/" rel="alternate" type="text/html" title="Pushing the limits of 1Blocker custom rules" /><published>2020-04-18T00:00:00+00:00</published><updated>2020-04-18T00:00:00+00:00</updated><id>https://wells.ee/journal/1blocker-custom-rules</id><content type="html" xml:base="https://wells.ee/journal/2020-04-18-1blocker-custom-rules/"><![CDATA[<p>I am a proud Safari user. It’s fast, <a href="https://www.macobserver.com/tmo/article/safari-offers-longer-battery-life-than-chrome-or-firefox">saves battery power</a>, it’s simple, and it syncs effortlessly across all of my devices. Oh, and not having Google breathing down my neck is nice too 😊</p>

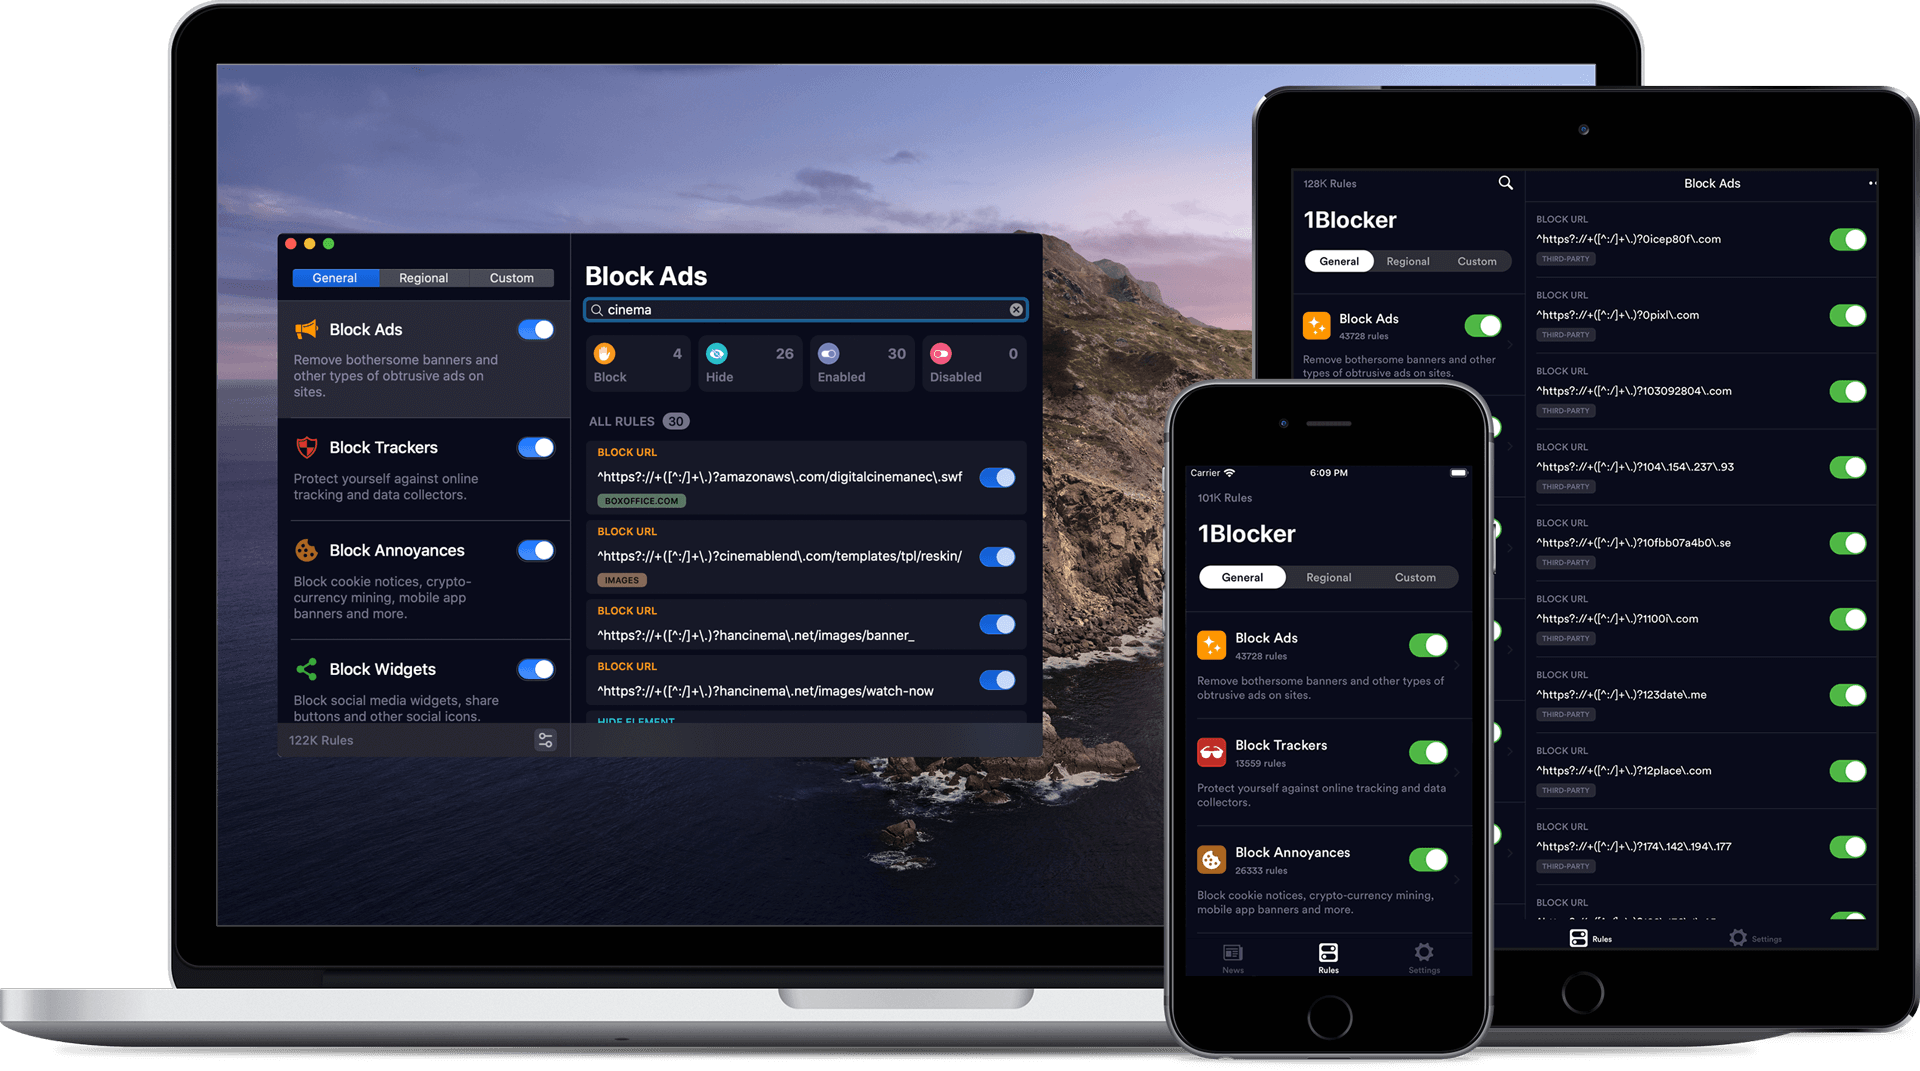
<p>I’ve been using <a href="https://1blocker.com">1Blocker</a> basically since it came out to block ads, trackers, social widgets, and the like on my Mac and iPhone. It blocks pretty much everything and rarely breaks websites.</p>

<p><img src="/images/2020-04-18-1blocker-custom-rules/1blocker.png" alt="1blocker" /></p>

<p>Along with the default lists, you can specify your own custom rules to block entire sites (like Facebook!), cookies, and… CSS elements.</p>

<p>Oh boy! Are you thinking what I’m thinking?</p>

<p>I have two simple principles:</p>

<ol>
  <li>Make the Web a more calm place. Daily tasks like shopping, budgeting, and reading the news should be task-oriented.</li>
  <li>Fuck ads.</li>
</ol>

<p>Ok let’s butcher some websites!</p>

<h2 id="amazon">Amazon</h2>

<div class="twentytwenty-container">
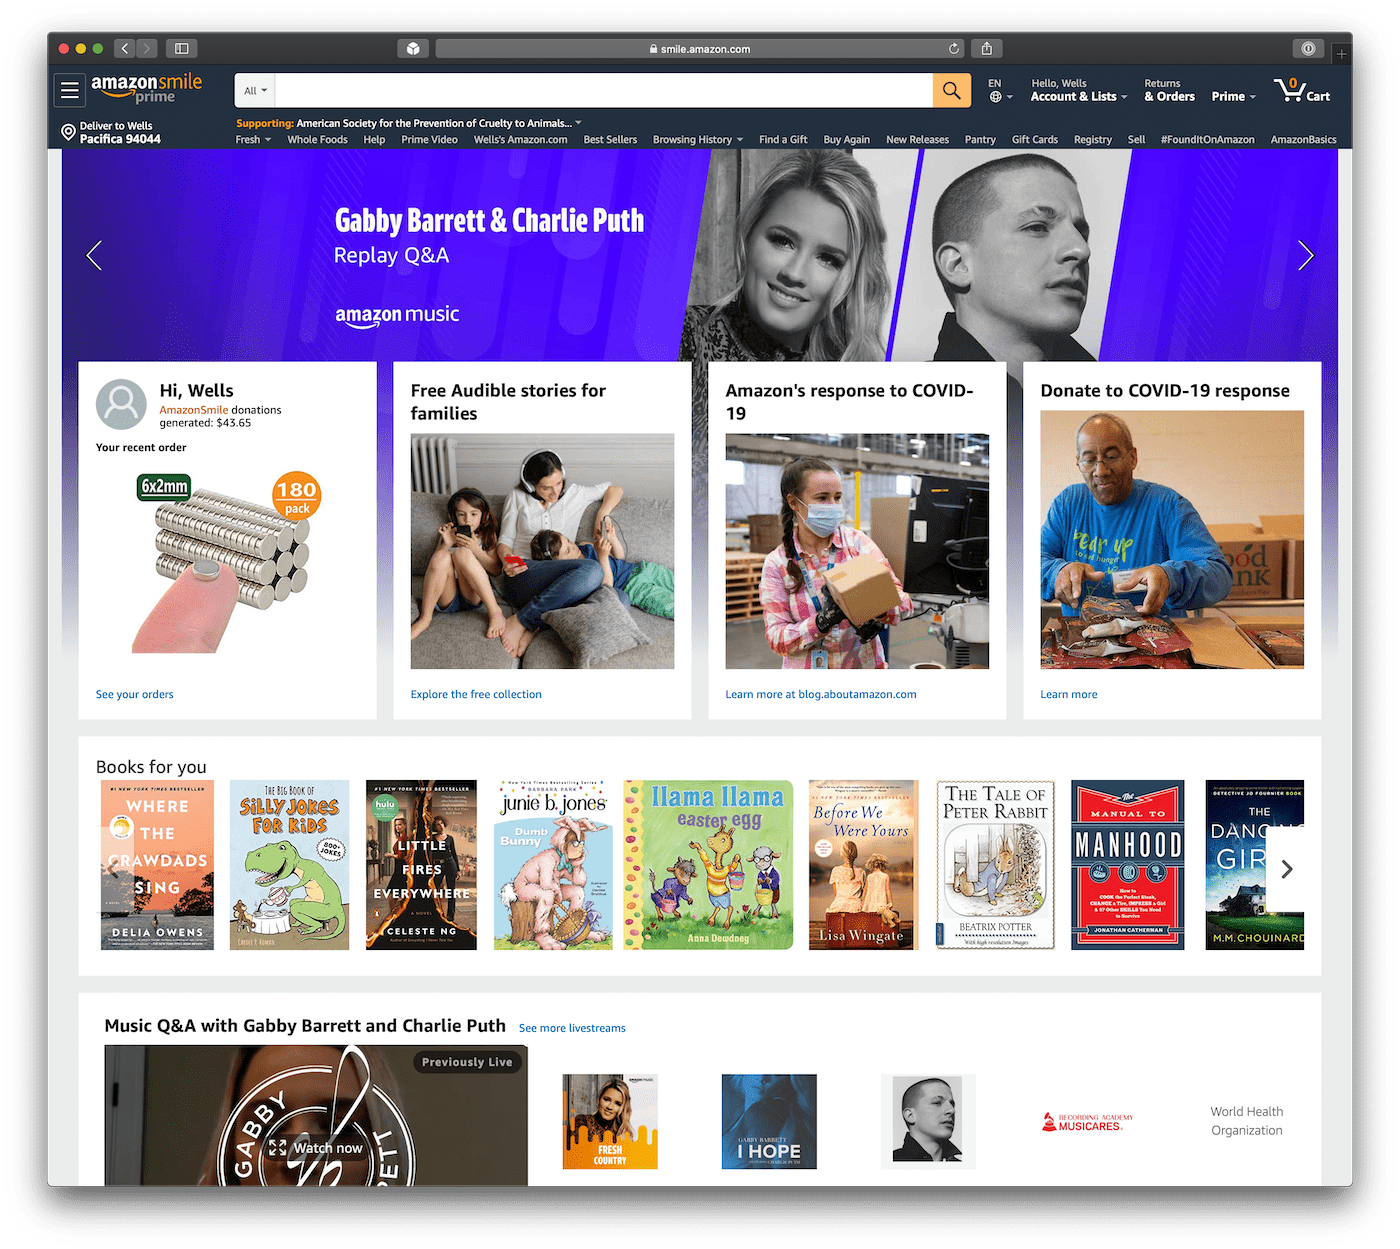
	<img src="/images/2020-04-18-1blocker-custom-rules/amazon-after.png" alt="amazon.com homepage after" />
 	<img src="/images/2020-04-18-1blocker-custom-rules/amazon-before.png" alt="amazon.com homepage before" />
</div>
<figcaption>Amazon.com homepage, before and after</figcaption>

<p>The difference is shocking. At first, it feels like there’s something missing. But that feeling quickly goes away… especially once you remember that 100% of the garbage that Amazon puts in front of you isn’t actually relevant to what you’re searching for. But you know what is? The search bar!</p>

<div class="twentytwenty-container">
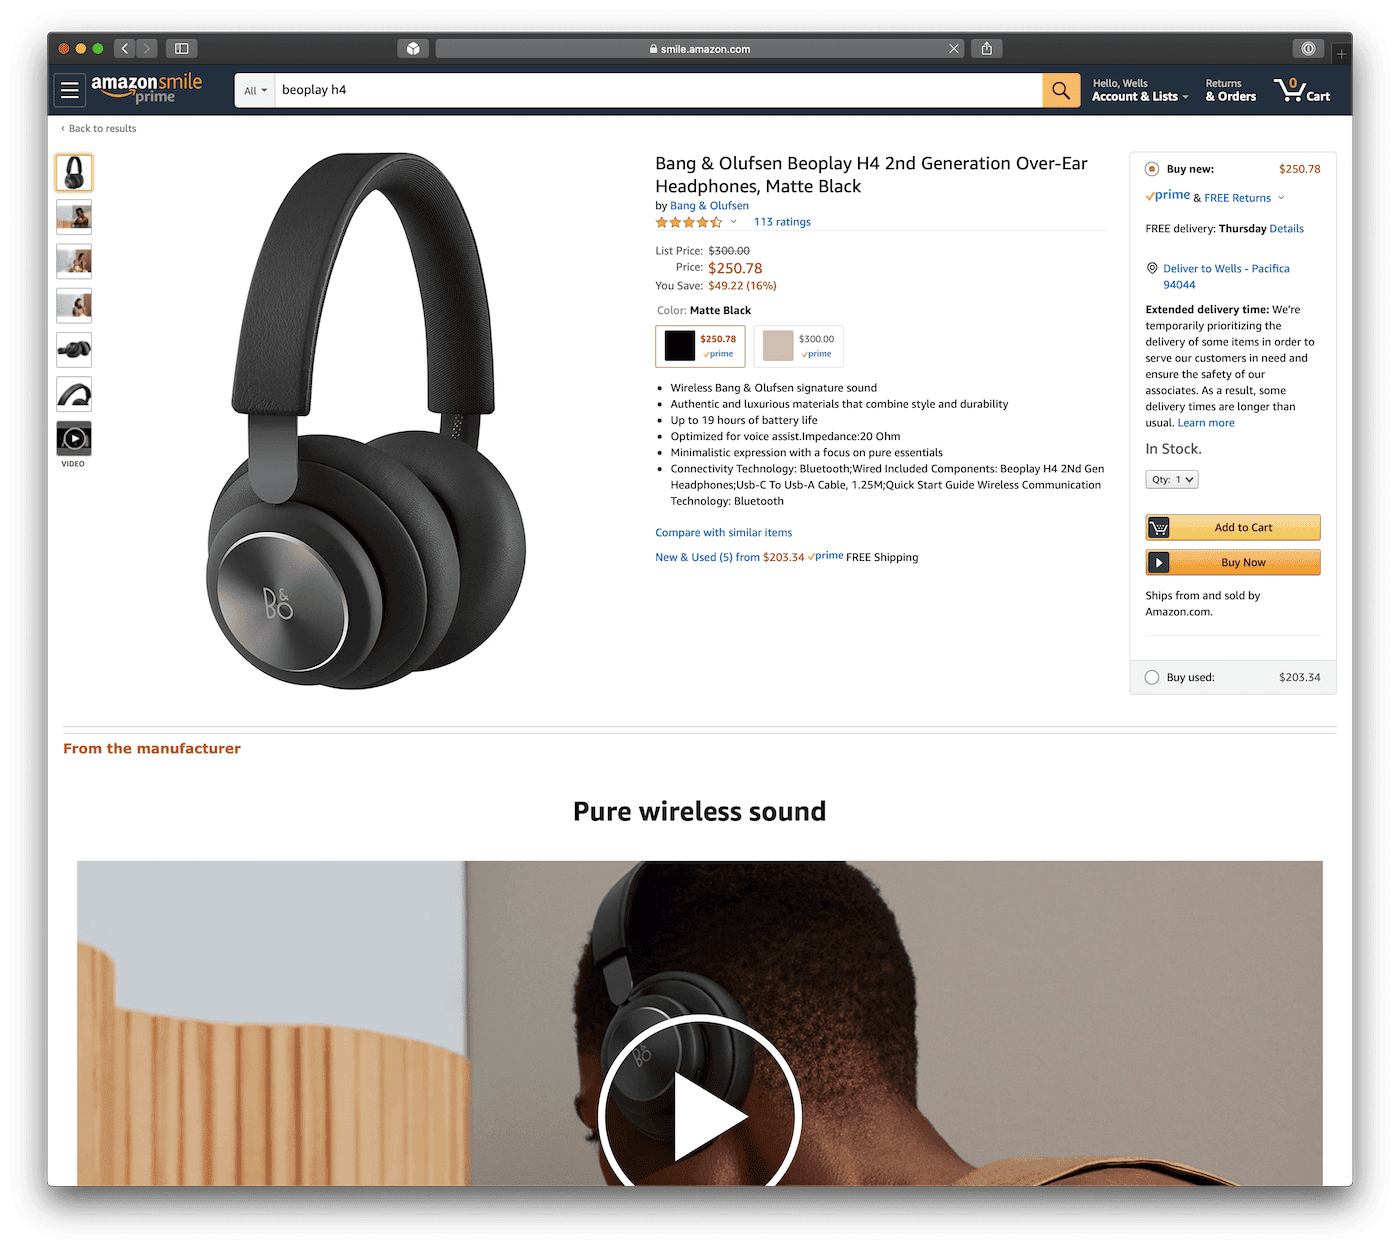
	<img src="/images/2020-04-18-1blocker-custom-rules/amazon-product-after.png" alt="amazon.com product page after" />
 	<img src="/images/2020-04-18-1blocker-custom-rules/amazon-product-before.png" alt="amazon.com product page before" />
</div>
<figcaption>Amazon.com product page, before and after</figcaption>

<p>It turns out the product page has a lot of redundant information, and all of the added clutter actually makes it <strong>harder</strong> to find the information you’re looking for. Without all of the extraneous information the product images are bigger too!</p>

<p>The default 1Blocker rules also don’t catch Amazon’s ads for pills, extended warranties, and their music service. None of which I ever plan to use.</p>

<p>Here’s what the magic looks like behind the scenes:</p>

<div class="language-json highlighter-rouge"><div class="highlight"><pre class="highlight"><code><span class="nl">"rules"</span><span class="p">:</span><span class="w"> </span><span class="p">[</span><span class="w">
  </span><span class="p">{</span><span class="w">
    </span><span class="nl">"content"</span><span class="p">:</span><span class="w"> </span><span class="p">{</span><span class="w">
      </span><span class="nl">"action"</span><span class="p">:</span><span class="w"> </span><span class="p">{</span><span class="w">
        </span><span class="nl">"type"</span><span class="p">:</span><span class="w"> </span><span class="s2">"css-display-none"</span><span class="p">,</span><span class="w">
        </span><span class="nl">"selector"</span><span class="p">:</span><span class="w"> </span><span class="s2">"#nav-upnav .nav-a, #nav-upnav, #pageContent, #productAlert_feature_div, #percolate-ui-ilm_div, #hqpWrapper, #center-28_feature_div, #dpx-giveaway_feature_div, #rhf, #nav-xshop &gt; *, #icp-nav-flyout, #nav-link-prime, #sc-new-upsell, #cart-recs-carousel, #cart-item-recs, .prime-ad-banner-content, .recsWidgetContainer, #bia-hcb-widget, .nav-template.nav-flyout-sidePanel-content, .navFooterMoreOnAmazon, #bia_content, #vse-related-videos, .similarities-widget, .sims-carousel-holder, #ask-dp-search_feature_div, #nav-subnav, #nav-global-location-slot, #nav-xshop, #nav-main, #issuancePriceblockAmabot_feature_div, #mbb_feature_div, #navFooter, #smileEligibility_feature_div, #alternativeOfferEligibilityMessaging_feature_div, #image-canvas-caption, #edpIngress_feature_div, #digitalDashLowProminenceAccordion_feature_div, #addToWishlistAccordion_feature_div, #tradeInButton_feature_div, #moreBuyingChoices_feature_div, #olpLinkWidget_feature_div, #va-related-videos-widget_feature_div, #giveaway_feature_div"</span><span class="w">
      </span><span class="p">},</span><span class="w">
      </span><span class="nl">"trigger"</span><span class="p">:</span><span class="w"> </span><span class="p">{</span><span class="w">
        </span><span class="nl">"url-filter-is-case-sensitive"</span><span class="p">:</span><span class="w"> </span><span class="kc">true</span><span class="p">,</span><span class="w">
        </span><span class="nl">"url-filter"</span><span class="p">:</span><span class="w"> </span><span class="s2">".*"</span><span class="p">,</span><span class="w">
        </span><span class="nl">"if-domain"</span><span class="p">:</span><span class="w"> </span><span class="p">[</span><span class="w">
          </span><span class="s2">"*amazon.com"</span><span class="w">
        </span><span class="p">]</span><span class="w">
      </span><span class="p">}</span><span class="w">
    </span><span class="p">},</span><span class="w">
    </span><span class="nl">"name"</span><span class="p">:</span><span class="w"> </span><span class="s2">"Hide Amazon.com annoyances"</span><span class="p">,</span><span class="w">
    </span><span class="nl">"id"</span><span class="p">:</span><span class="w"> </span><span class="s2">"593554FC-931F-4C98-AA3F-11CF048AC7CD"</span><span class="w">
  </span><span class="p">}</span><span class="w">
</span><span class="p">]</span><span class="w">
</span></code></pre></div></div>

<p>At the end of this post, I’ll include a download link that adds all of these rules to 1Blocker with one click.</p>

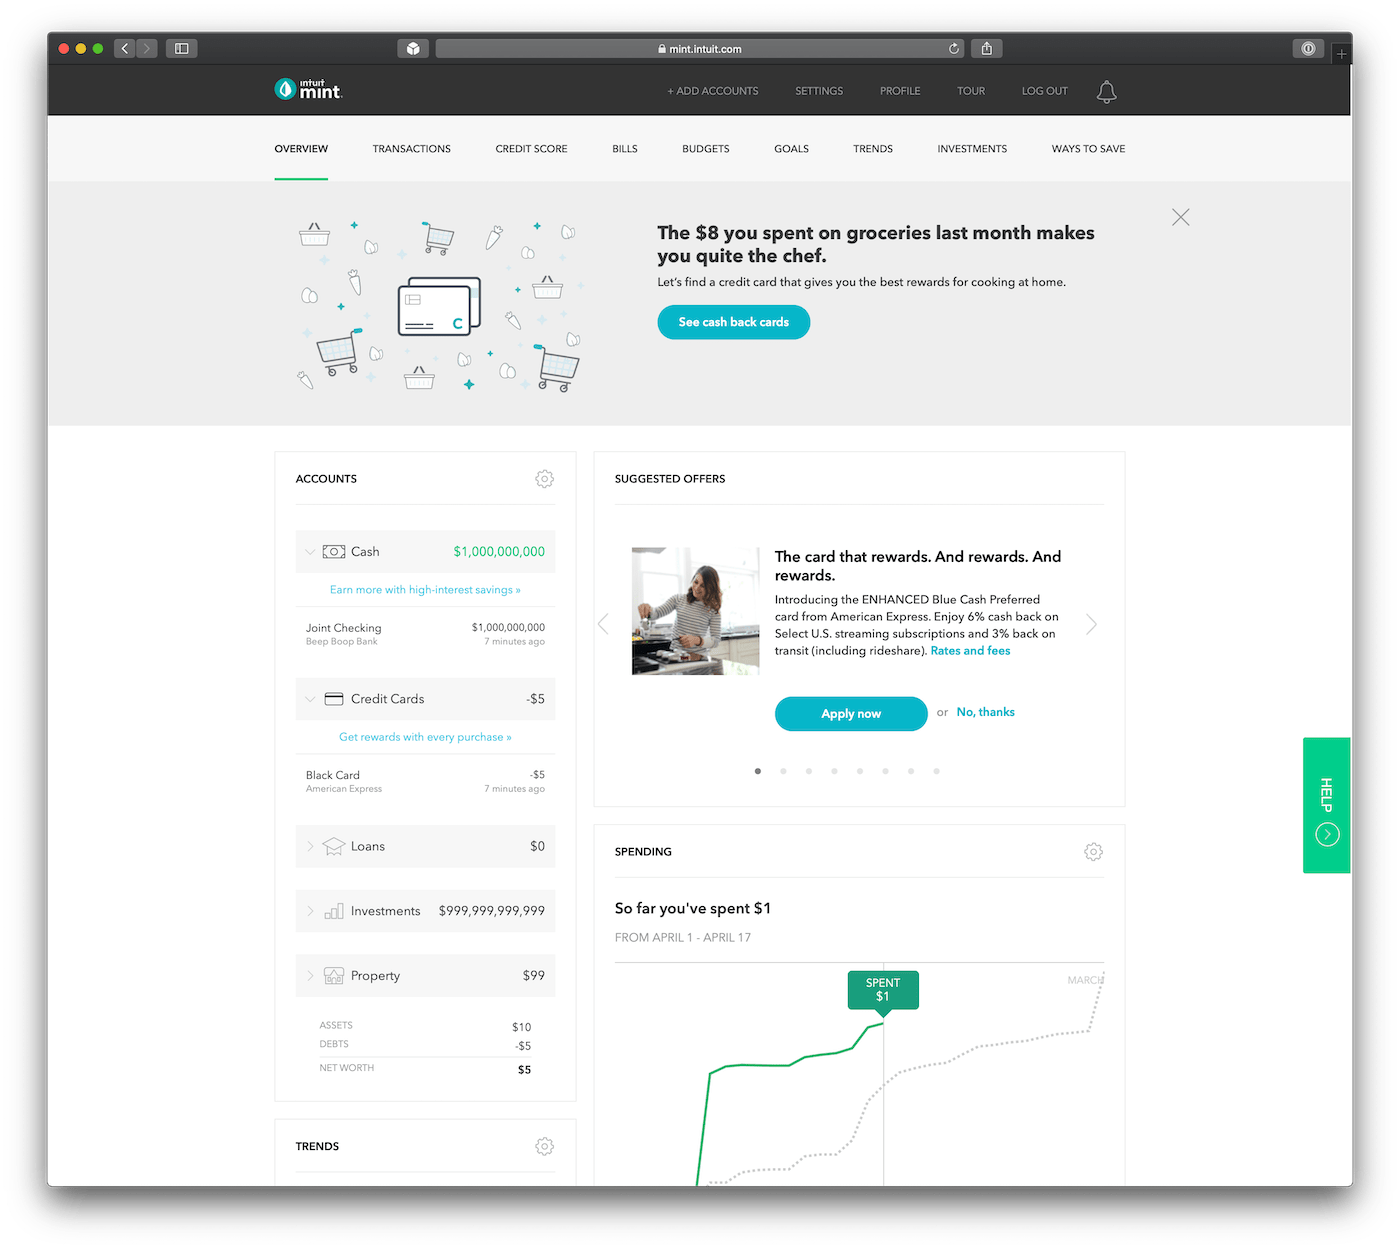
<h2 id="mint">Mint</h2>

<p>While I wait for <a href="https://www.monarchmoney.com?r=206C7E">Monarch</a> to launch, I must rely on Mint for basic budgeting and cashflow tracking. Mint makes money by <del>selling your financial data</del> offering you credit cards and financial services scattered throughout the Mint app.</p>

<p>Or at least they used to!</p>

<div class="twentytwenty-container">
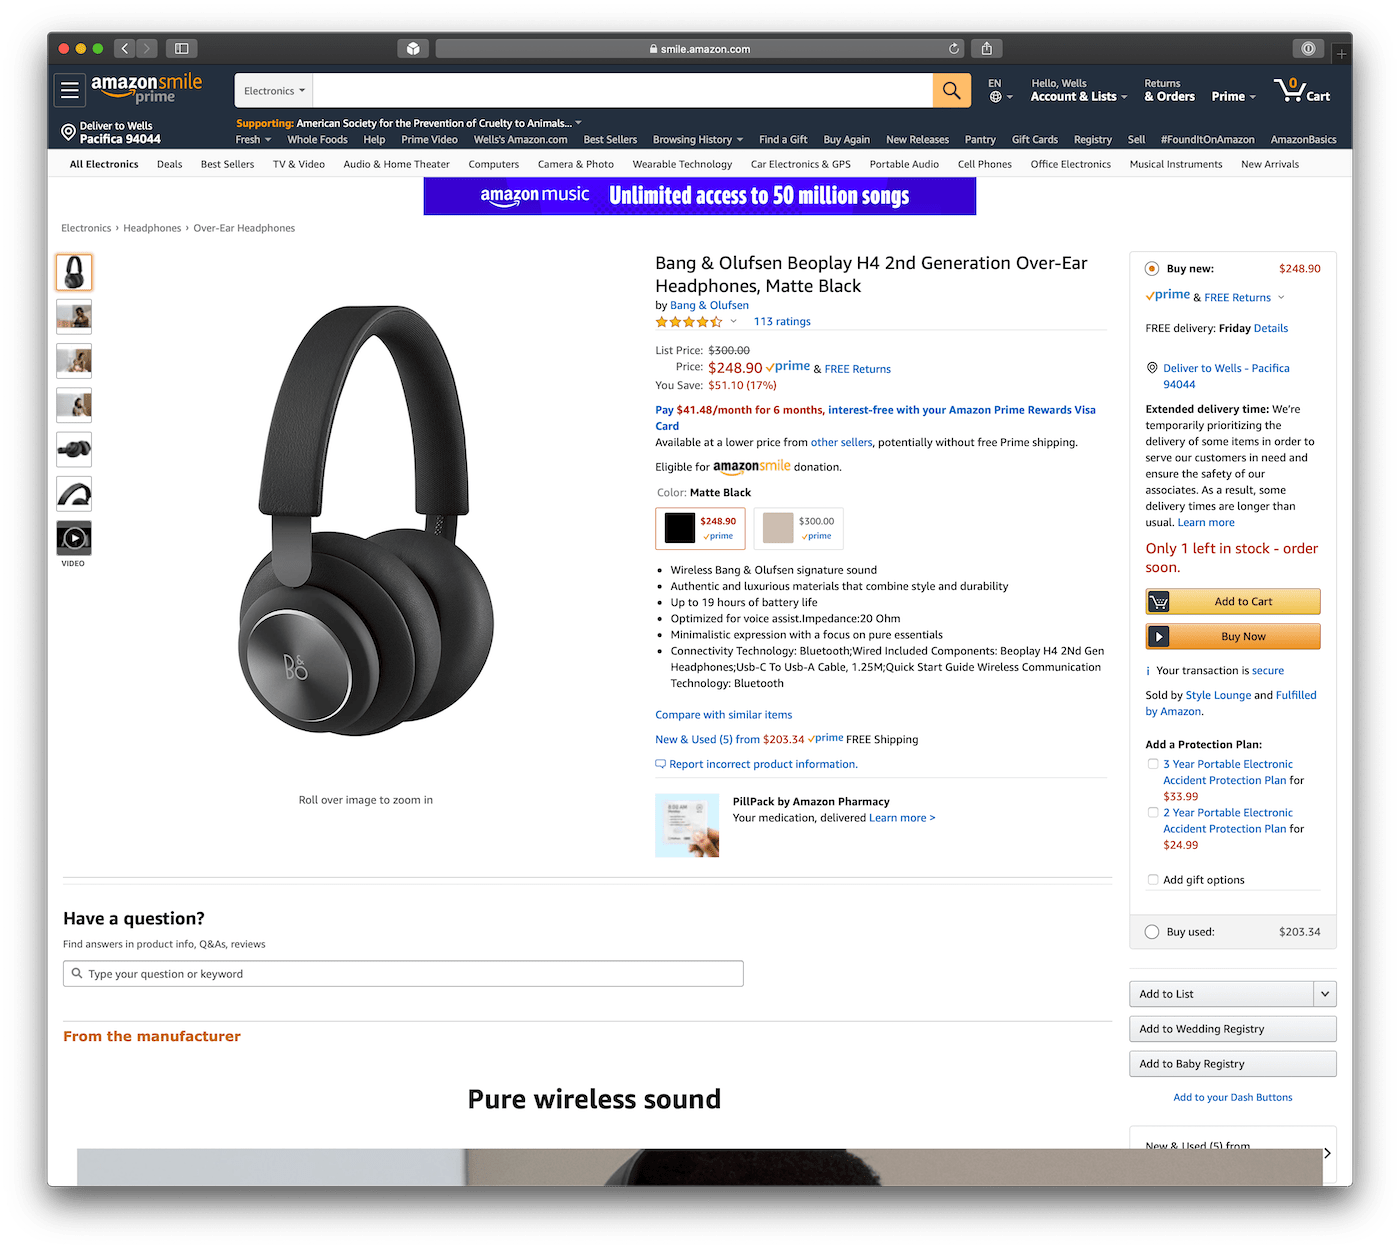
	<img src="/images/2020-04-18-1blocker-custom-rules/mint-after.png" alt="mint.com overview page after" />
 	<img src="/images/2020-04-18-1blocker-custom-rules/mint-before.png" alt="mint.com overview page before" />
</div>
<figcaption>Mint.com overview page&mdash;yes the numbers are real</figcaption>

<p>Mint actually becomes somewhat usable when you reclaim 50% of the screen from ads and use it for… I don’t know, financial analysis… instead.</p>

<p>Yes, most of the ads have close buttons. But they come back every time you log in, and I just don’t have the mental energy to be disappointed by my 401(k) <em>and</em> close a bunch of ads for credit cards that offer worse points-per-dollar and lower credit limits than what I already have.</p>

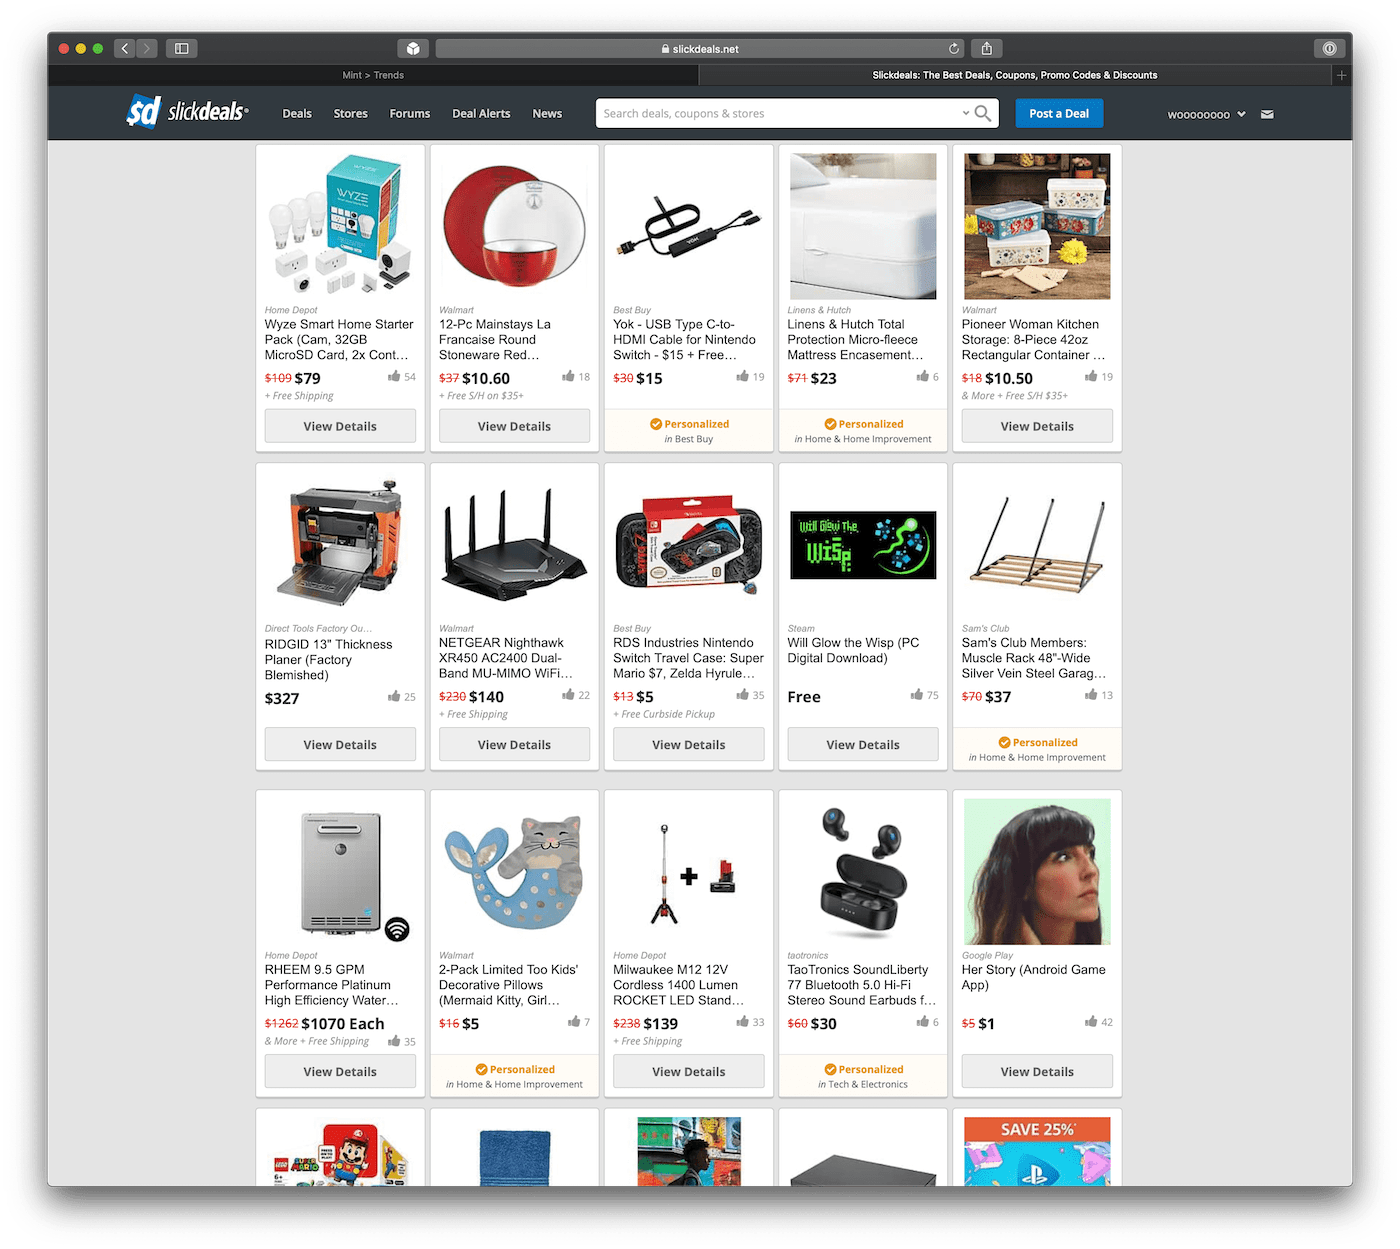
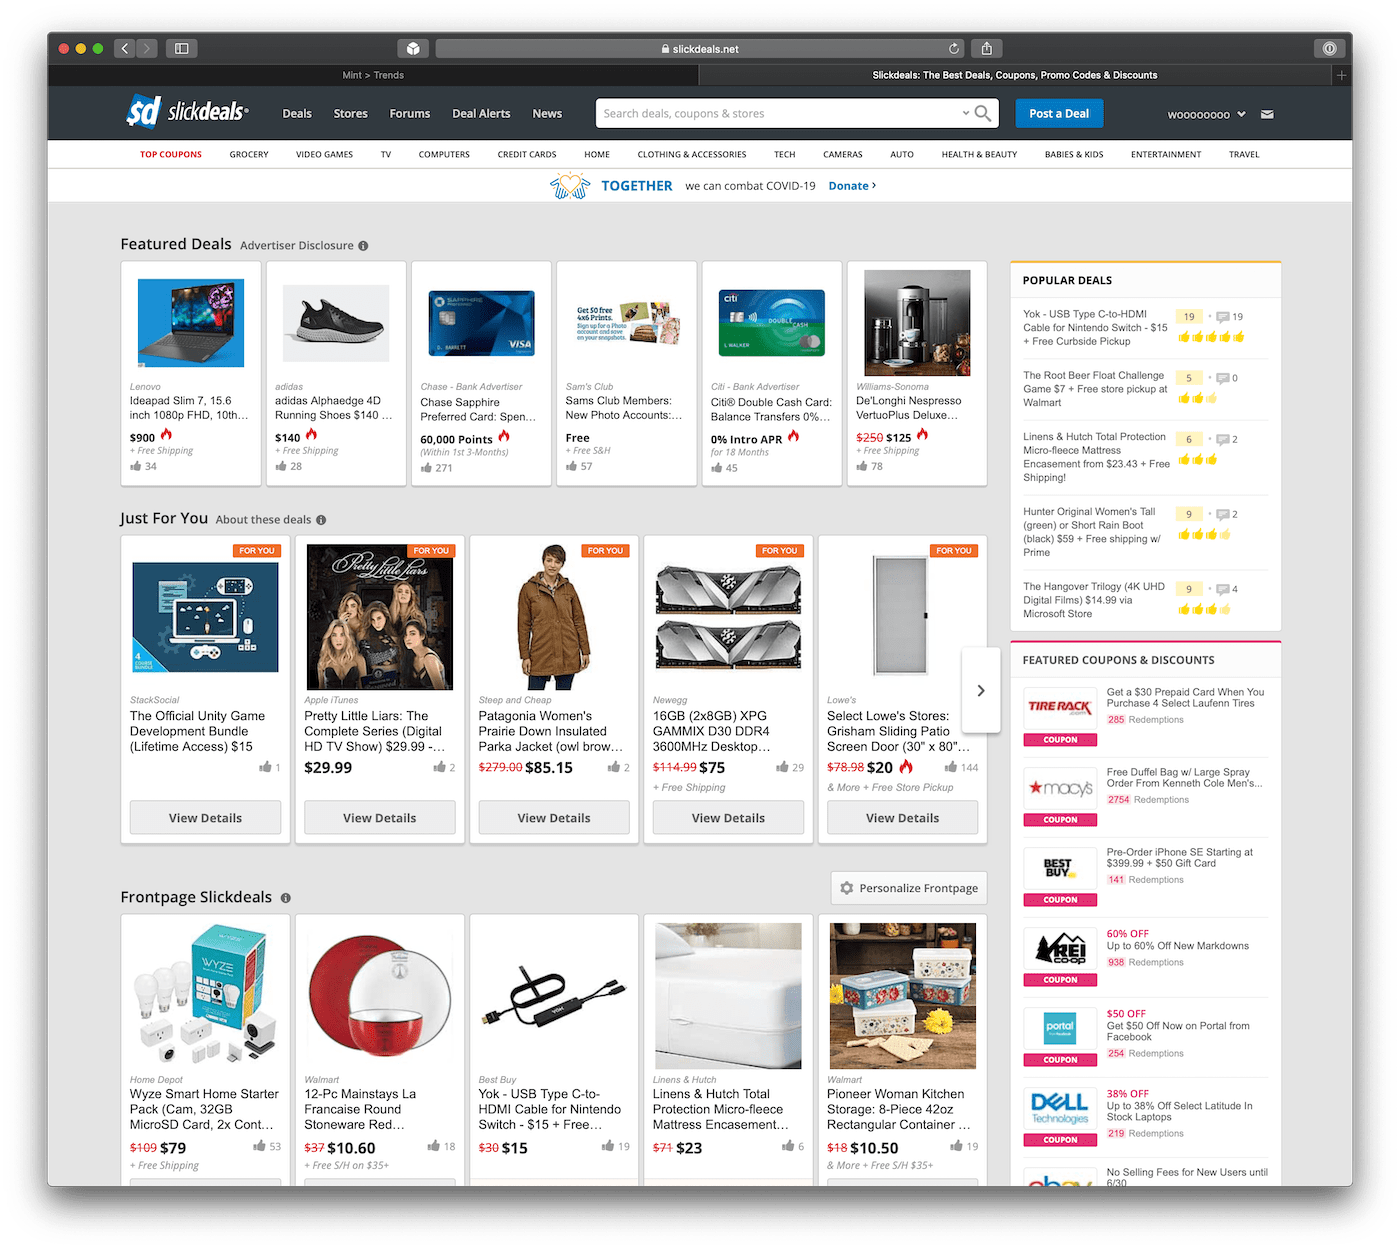
<h2 id="slickdeals">Slickdeals</h2>

<p>Don’t judge me.</p>

<div class="twentytwenty-container">
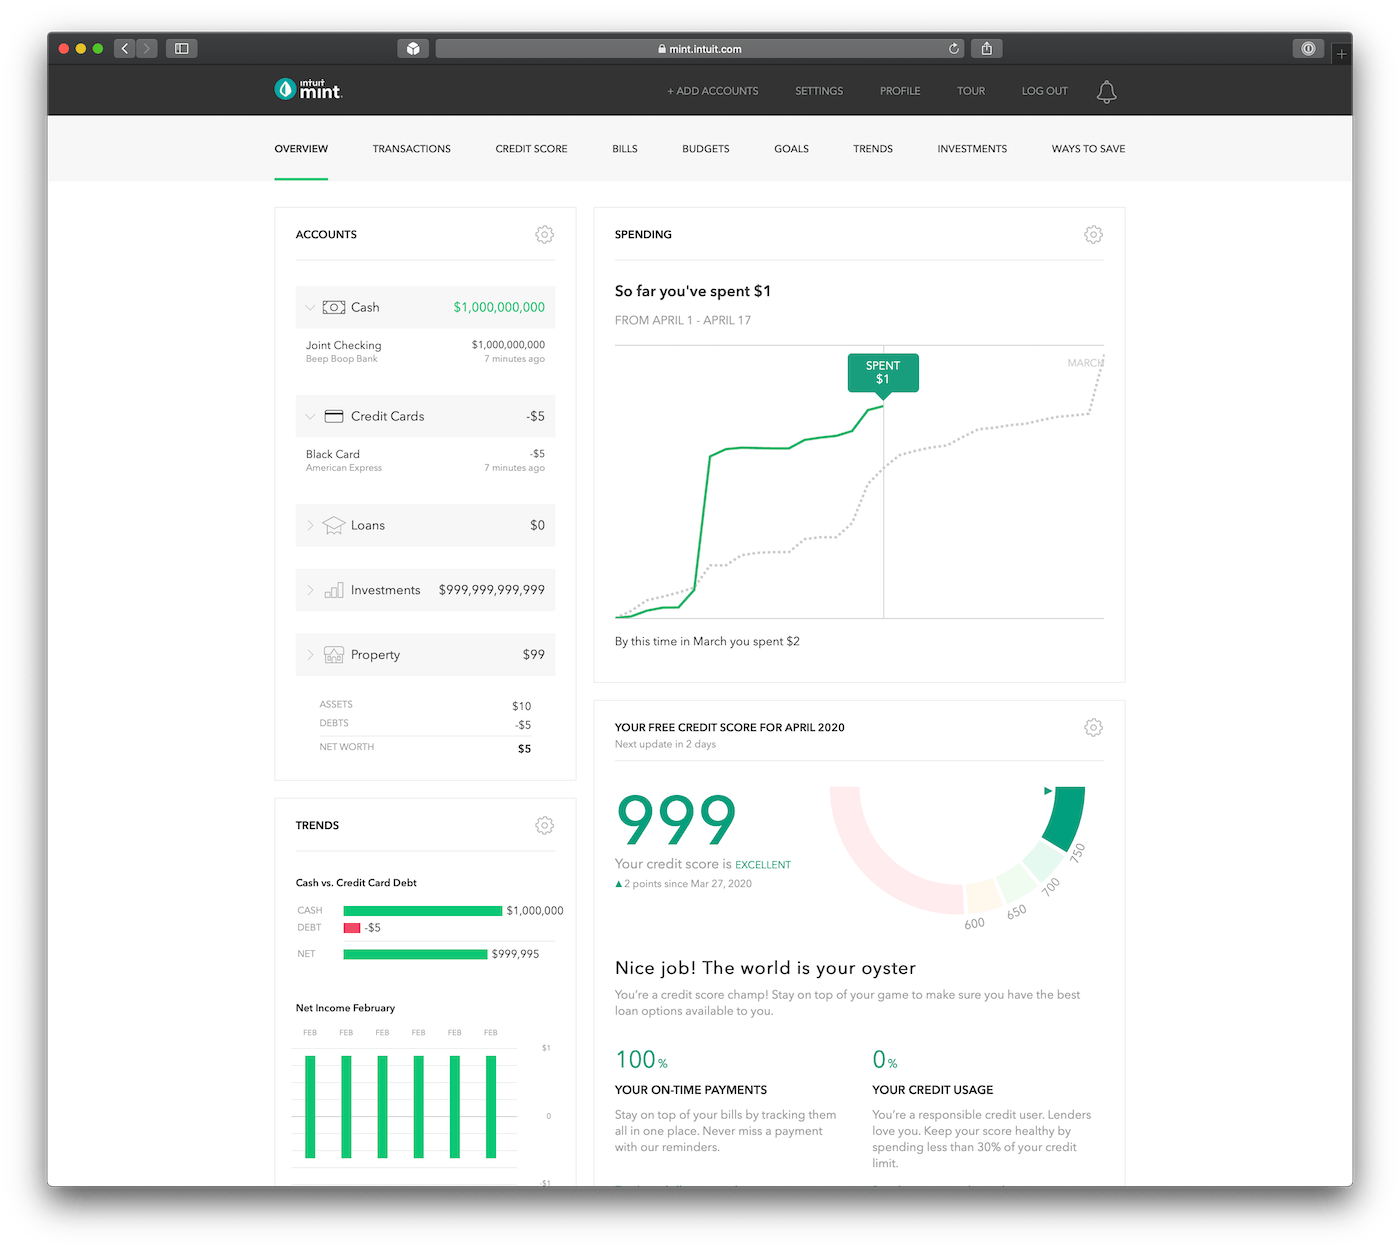
	<img src="/images/2020-04-18-1blocker-custom-rules/slickdeals-after.png" alt="slickdeals.net homepage after" />
 	<img src="/images/2020-04-18-1blocker-custom-rules/slickdeals-before.png" alt="slickdeals.net homepage before" />
</div>
<figcaption>Slickdeals.net homepage, before and after</figcaption>

<p>Sometimes I do browse. Can’t have too many 8TB NAS drives or Staples pricing errors on ballpoint pens, right? The only problem is that most of the screen real estate is devoted to ads and promoted “deals” that aren’t vetted by the community.</p>

<p>Or, at least, it used to be! Now it’s <strong>only</strong> crowdsourced deals. Slickdeals is a great example of a site that I’d typically never visit becuase it’s just too infested with ads, misdirection, and clutter to be useful. But with 1Blocker custom rules, it actually <em>can</em> be a useful resource sometimes.</p>

<h2 id="get-the-calm-web-extension">Get the Calm Web extension</h2>

<p>You can <a href="https://github.com/wr/1blocker-calmweb">download</a> a pre-packaged Calm Web extension that includes support for Amazon, Mint, Chase, Target, MacRumors, Slickdeals, and a few more.</p>

<p>I put it up on GitHub in the hopes that folks will contribute their own custom rules. The Web is a noisy, frantic place full of ads, distractions, and clutter. Maybe we can calm it down a bit. 😌</p>

<script src="/js/jquery.event.move.js" type="text/javascript"></script>

<script src="/js/jquery.twentytwenty.js" type="text/javascript"></script>

<link rel="stylesheet" href="/css/twentytwenty-no-compass.css" type="text/css" media="screen" />

<script>
$(function(){
  $(".twentytwenty-container").twentytwenty({
    default_offset_pct: 0.1, // How much of the before image is visible when the page loads
    orientation: 'horizontal', // Orientation of the before and after images ('horizontal' or 'vertical')
    before_label: '', // Set a custom before label
    after_label: '', // Set a custom after label
    no_overlay: true, //Do not show the overlay with before and after
    move_slider_on_hover: false, // Move slider on mouse hover?
    move_with_handle_only: true, // Allow a user to swipe anywhere on the image to control slider movement. 
    click_to_move: false // Allow a user to click (or tap) anywhere on the image to move the slider to that location.
  });
});
</script>]]></content><author><name>Wells Riley</name></author><category term="web" /><category term="guide" /><summary type="html"><![CDATA[Safari content blockers are super powerful. Let's harness that power to customize the heck out of some popular sites]]></summary><media:thumbnail xmlns:media="http://search.yahoo.com/mrss/" url="https://wells.ee/images/2020-04-18-1blocker-custom-rules/og.png" /><media:content medium="image" url="https://wells.ee/images/2020-04-18-1blocker-custom-rules/og.png" xmlns:media="http://search.yahoo.com/mrss/" /></entry><entry><title type="html">Bypassing the AT&amp;amp;T Fiber modem with a UniFi USG</title><link href="https://wells.ee/journal/2020-03-01-bypassing-att-fiber-modem-unifi-usg/" rel="alternate" type="text/html" title="Bypassing the AT&amp;amp;T Fiber modem with a UniFi USG" /><published>2020-03-01T00:00:00+00:00</published><updated>2020-03-01T00:00:00+00:00</updated><id>https://wells.ee/journal/bypassing-att-fiber-modem-unifi-usg</id><content type="html" xml:base="https://wells.ee/journal/2020-03-01-bypassing-att-fiber-modem-unifi-usg/"><![CDATA[<p><strong>Update 2020-08-05:</strong> I’ve compiled a new guide detailing how you can also do this with a UniFi Dream Machine Pro, which you can find <a href="/journal/2020-08-05-bypassing-att-fiber-modem-udmp">here</a>.</p>

<p><em>As an eBay Partner, I may be compensated if you make a purchase.</em></p>

<p>Last week I discovered that AT&amp;T had run fiber optic cable in my neighborhood. It was a no-brainer for me to switch from Comcast’s ‘gigabit’ (1000/40) service to AT&amp;T’s symmetrical (1000/1000) fiber to the home. $10 cheaper, no less!</p>

<p>The onsite tech did an amazing job running a dedicated fiber line right into my garage and mounting the ONT right above my lab. And I’ve got near line speeds (~946 symmetrical on Ethernet), so everything is perfect.</p>

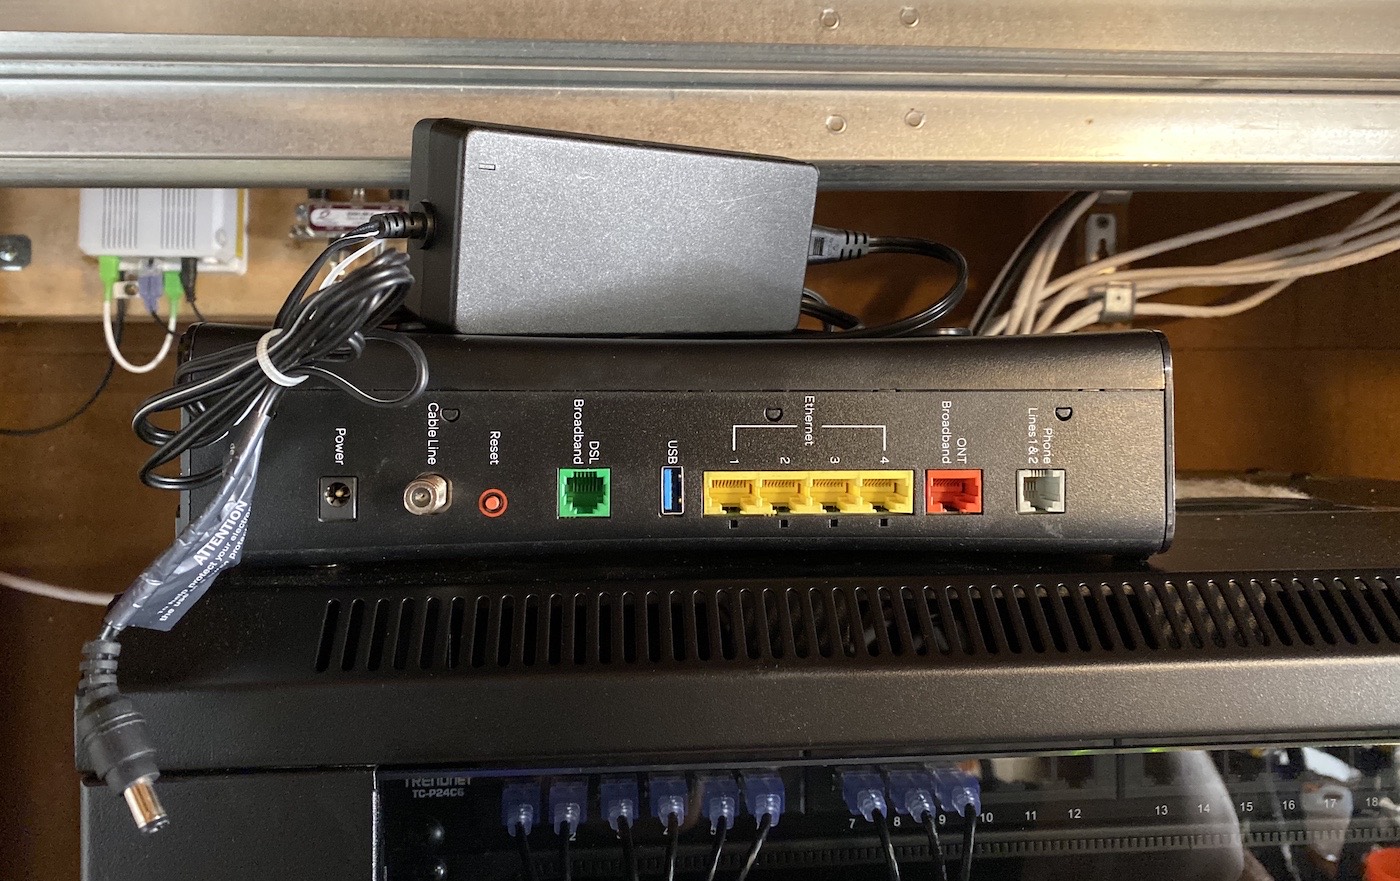
<p>…except the modem. Look at this chonker! It has its own ZIP code! And they somehow couldn’t fit the power supply inside the mammoth plastic shell, so it has a <strong>power brick</strong> too.
<img src="/images/2020-03-01-bypassing-att-fiber-modem-unifi-usg/chonkers.jpg" alt="big chonk modem" /></p>

<p>Also, it has <em>no true bridge mode</em>, so it’s incompatible with my <a href="https://www.amazon.com/gp/product/B00LV8YZLK/ref=as_li_tl?ie=UTF8&amp;camp=1789&amp;creative=9325&amp;creativeASIN=B00LV8YZLK&amp;linkCode=as2&amp;tag=wr088e-20&amp;linkId=6bb638983409338c6869bad49d28dfe2">UniFi Security Gateway</a> and current home network. I’d end up in a double NAT situation unless I let AT&amp;T’s modem handle DHCP, firewall, port forwarding, etc. Not ideal!</p>

<p>Unfortunately the RG (that’s what AT&amp;T calls the modem) authenticates with the AT&amp;T Fiber network with a special hard-coded certificate unique to each modem, so you can’t just throw the RG into a bin and plug your USG directly into the fiber ONT. It’ll fail the handshake and never go online. Or can you?</p>

<p>I tried two methods, and happily landed on the latter. This guide is a consolidation of a smattering of guides I found online.</p>

<h2 id="method-1-eap-proxy">Method 1: EAP Proxy</h2>

<p>This method requires that you plug the RG into the WAN2/LAN2 port on the USG, and configures the USG to forward authentication packets between the RG and ONT. This bypasses the RG’s NAT and DHCP letting you run your network normally, as if there were a true bridge mode from AT&amp;T.</p>

<p>This method is less desirable because it requires the huge bulky RG to be plugged in at all times.</p>

<p>I won’t go into detail on this method because the complete guide lives on <a href="https://medium.com/@mrtcve/at-t-gigabit-fiber-modem-bypass-using-unifi-usg-updated-c628f7f458cf">Taylor Smith’s blog</a>.</p>

<h2 id="method-2-wpa_supplicant">Method 2: wpa_supplicant</h2>

<p>This method is vastly preferred because you can connect the USG directly to the ONT without needing the RG at all. It’s more work though—-you need the private key from a working RG (model NVG589) obtained by rooting the device.</p>

<p>Then you install the wpa_supplicant on the USG and instruct it to use the .pem files you obtained from the sacrificial RG.</p>

<p>This guide is adapted from a <a href="https://www.dslreports.com/forum/r32391619-">DSLReports forum thread</a> on this topic. This guide may also work with the <a href="https://www.amazon.com/gp/product/B019PBEI5W/ref=as_li_tl?ie=UTF8&amp;camp=1789&amp;creative=9325&amp;creativeASIN=B019PBEI5W&amp;linkCode=as2&amp;tag=wr088e-20&amp;linkId=4e8295d52c92751f013f6ae21763d48a">Unifi Security Gateway Pro</a> and the <a href="https://www.amazon.com/gp/product/B081QNJFPV/ref=as_li_tl?ie=UTF8&amp;tag=wr088e-20&amp;camp=1789&amp;creative=9325&amp;linkCode=as2&amp;creativeASIN=B081QNJFPV&amp;linkId=a6269b22aea1ae0cc51bc1950fa42ce5">Dream Machine</a> / <a href="https://www.amazon.com/gp/product/B019PBEI5W/ref=as_li_tl?ie=UTF8&amp;tag=wr088e-20&amp;camp=1789&amp;creative=9325&amp;linkCode=as2&amp;creativeASIN=B019PBEI5W&amp;linkId=d29659841a9a867a8edea881a0e34e26">Dream Machine Pro</a> but I haven’t personally tested it.</p>

<h3 id="instructions">Instructions</h3>

<h4 id="step-1">Step 1</h4>

<p>First we need a rooted NVG589 modem. AT&amp;T may not have supplied you with this model (I was given a Pace 5268AC), but they can be <a href="https://www.ebay.com/sch/11176/i.html?_nkw=NVG589&amp;mkcid=1&amp;mkrid=711-53200-19255-0&amp;siteid=0&amp;campid=5338674798&amp;customid=&amp;toolid=10001&amp;mkevt=1">found on eBay</a> sometimes. <a href="http://earlz.net/view/2012/06/07/0026/rooting-the-nvg510-from-the-webui">Follow this guide</a> that details rooting the device and extracting the needed certificate files.</p>

<p>OR you can do what I did and <em>purchase</em> the rooted files. For about $40 I was able to instantly move to the next step without waiting for a modem to ship and bumbling through rooting the device. A seller called <a href="https://www.ebay.com/sch/maczrool/m.html?_nkw=&amp;_armrs=1&amp;_ipg=&amp;_from=&amp;mkcid=1&amp;mkrid=711-53200-19255-0&amp;siteid=0&amp;campid=5338674798&amp;customid=&amp;toolid=10001&amp;mkevt=1">maczrool on eBay sells unique rooted certificates</a> and seems to have a lot of them.</p>
<aside class="info"><strong>Note:</strong> I am in no way affiliated with this person, aside from being a happy customer.</aside>

<p>In order to move forward you need the following files from your rooted RG (or eBay):</p>

<ul>
  <li>CA_XXXXXX-XXXXXXXXXXXXXX.pem</li>
  <li>Client_XXXXXX-XXXXXXXXXXXXXX.pem</li>
  <li>PrivateKey_PKCS1_XXXXXX-XXXXXXXXXXXXXX.pem</li>
  <li>wpa_supplicant.conf</li>
  <li>The MAC address of the rooted device (printed on the back of the RG, or included with the files from eBay)</li>
  <li>The IP address, username, and password of your UniFi controller. In this guide I’m using <code class="language-plaintext highlighter-rouge">10.0.1.5</code> for the IP and <code class="language-plaintext highlighter-rouge">admin</code> for the username.</li>
</ul>

<aside class="info"><strong>Note:</strong> If you instead have .der and mfg.dat files, follow <a href="https://www.devicelocksmith.com/2018/12/eap-tls-credentials-decoder-for-nvg-and.html" target="_blank">this guide</a> to decode them to obtain your .pem and wpa_supplicant.conf files.</aside>

<h4 id="step-2">Step 2</h4>

<p>Download <a href="https://www.dslreports.com/r0/download/2382315~c173ce2d062cf92116ed2427bb79dd18/wpa_supplicant.zip">wpa_supplicant</a> from the DSLReports forum, then copy the file to a writeable folder on your USG.</p>

<div class="language-shell highlighter-rouge"><div class="highlight"><pre class="highlight"><code><span class="c"># switch to the directory where you downloaded wpa_supplicant</span>
<span class="nv">$ </span><span class="nb">cd</span> /path/to/wpa_supplicant
<span class="c"># copy wpa_supplicant to the USG using SCP</span>
<span class="nv">$ </span>scp ./wpa_supplicant admin@10.0.1.1:/config/scripts/post-config.d/
</code></pre></div></div>
<aside class="info"><strong>Note:</strong> <code class="language-plaintext highlighter-rouge">scp</code> is like <code class="language-plaintext highlighter-rouge">ssh</code> but for sending files from one computer to another. Use the username, password, and IP address of your UniFi controller here.</aside>

<p>SSH into your USG using the username/password you use to log into your UniFi Controller software. I use <a href="https://help.ubnt.com/hc/en-us/articles/235247068-UniFi-Adding-SSH-Keys-to-UniFi-Devices">SSH keys</a> in UniFi, so no password needed :)</p>

<div class="language-shell highlighter-rouge"><div class="highlight"><pre class="highlight"><code><span class="nv">$ </span>ssh admin@10.0.1.1
<span class="c"># move wpa_supplicant to the right folder</span>
<span class="nv">$ </span><span class="nb">sudo mv</span> /config/scripts/post-config.d/wpa_supplicant /config/scripts/
</code></pre></div></div>

<h4 id="step-3">Step 3</h4>

<p>Create a <code class="language-plaintext highlighter-rouge">wpa_supplicant.sh</code> script using the code below.</p>

<div class="language-shell highlighter-rouge"><div class="highlight"><pre class="highlight"><code><span class="nb">cd</span> /config/scripts/post-config.d/
nano wpa_supplicant.sh
</code></pre></div></div>

<p>This will open a text editor in your terminal called <code class="language-plaintext highlighter-rouge">nano</code>. Paste the below script into your terminal.</p>

<div class="language-shell highlighter-rouge"><div class="highlight"><pre class="highlight"><code><span class="c">#!/usr/bin/env bash</span>

<span class="c"># Start EAP-TLS on eth0</span>
<span class="c"># Check if already running to avoid multiple instances</span>
<span class="c"># Created by AntiTrust on DSLReports.com on May 15, 2019</span>
<span class="c"># https://www.dslreports.com/forum/r32391619-</span>
  
<span class="nv">IF_WAN</span><span class="o">=</span>eth0
<span class="nv">PROCESS_NAME</span><span class="o">=</span>wpa_supplicant
<span class="nv">PROCESS_PATH</span><span class="o">=</span>/config/scripts/wpa_supplicant
<span class="nv">PROCESS_COUNT</span><span class="o">=</span><span class="si">$(</span>ps <span class="nt">-A</span> | <span class="nb">grep</span> <span class="nv">$PROCESS_NAME</span> | egrep <span class="nt">-v</span> <span class="s2">"grep|</span><span class="si">$(</span><span class="nb">basename</span> <span class="nv">$0</span><span class="si">)</span><span class="s2">"</span> | <span class="nb">grep</span> <span class="nt">-c</span> <span class="nv">$PROCESS_NAME</span><span class="si">)</span>
  
<span class="k">if</span> <span class="o">[</span> <span class="nv">$PROCESS_COUNT</span> <span class="o">=</span> 0 <span class="o">]</span> <span class="o">&amp;&amp;</span> <span class="o">[</span> <span class="nt">-x</span> <span class="nv">$PROCESS_PATH</span> <span class="o">]</span><span class="p">;</span> <span class="k">then</span>
  <span class="nv">$PROCESS_PATH</span> <span class="nt">-s</span> <span class="nt">-B</span> <span class="nt">-Dwired</span> <span class="nt">-i</span><span class="nv">$IF_WAN</span> <span class="nt">-c</span>/config/scripts/wpa_supplicant.conf <span class="nt">-g</span>/var/run/wpa_supplicant.ctrl <span class="nt">-P</span>/var/run/wpa_supplicant.pid
<span class="k">fi</span>
</code></pre></div></div>
<aside class="warn"><strong>Note:</strong> the USG’s WAN port is <code class="language-plaintext highlighter-rouge">eth0</code> so edit <code class="language-plaintext highlighter-rouge">IF_WAN=eth0</code> if your WAN port is different)</aside>

<p>To save the file, press <span class="keyboard">Ctrl</span> <span class="keyboard">O</span> then <span class="keyboard">Ctrl</span> <span class="keyboard">X</span>. Now set appropriate file permissions.</p>

<div class="language-shell highlighter-rouge"><div class="highlight"><pre class="highlight"><code><span class="nv">$ </span><span class="nb">chmod</span> +x /config/scripts/wpa_supplicant
<span class="nv">$ </span><span class="nb">chmod</span> +x /config/scripts/post-config.d/wpa_supplicant.sh
</code></pre></div></div>

<h4 id="step-4">Step 4</h4>

<p>Back on your local terminal window, copy your files from Step 1 to your USG.</p>

<div class="language-shell highlighter-rouge"><div class="highlight"><pre class="highlight"><code><span class="c"># switch to the directory where you saved your files</span>
<span class="nv">$ </span><span class="nb">cd</span> /path/to/<span class="k">*</span>.pem
<span class="c"># copy the PEM files to the USG using SCP</span>
<span class="nv">$ </span>scp ./<span class="k">*</span>.pem admin@10.0.1.1:/config/scripts/post-config.d/
<span class="c"># copy wpa_supplicant.conf to the USG using SCP</span>
<span class="nv">$ </span>scp ./wpa_supplicant.conf admin@10.0.1.1:/config/scripts/post-config.d/
</code></pre></div></div>

<p>And in the terminal window where you’re SSH’ed into your USG, move the files to the right places.</p>

<div class="language-shell highlighter-rouge"><div class="highlight"><pre class="highlight"><code><span class="c"># move PEM files</span>
<span class="nv">$ </span><span class="nb">sudo mv</span> /config/scripts/post-config.d/<span class="k">*</span>.pem /config/auth/
<span class="c"># make PEM files read-only</span>
<span class="nv">$ </span><span class="nb">sudo chmod</span> <span class="nt">-R</span> 0600 /config/auth
<span class="c"># move conf file</span>
<span class="nv">$ </span><span class="nb">sudo mv</span> /config/scripts/post-config.d/wpa_supplicant.conf /config/scripts/
</code></pre></div></div>

<h4 id="step-5">Step 5</h4>

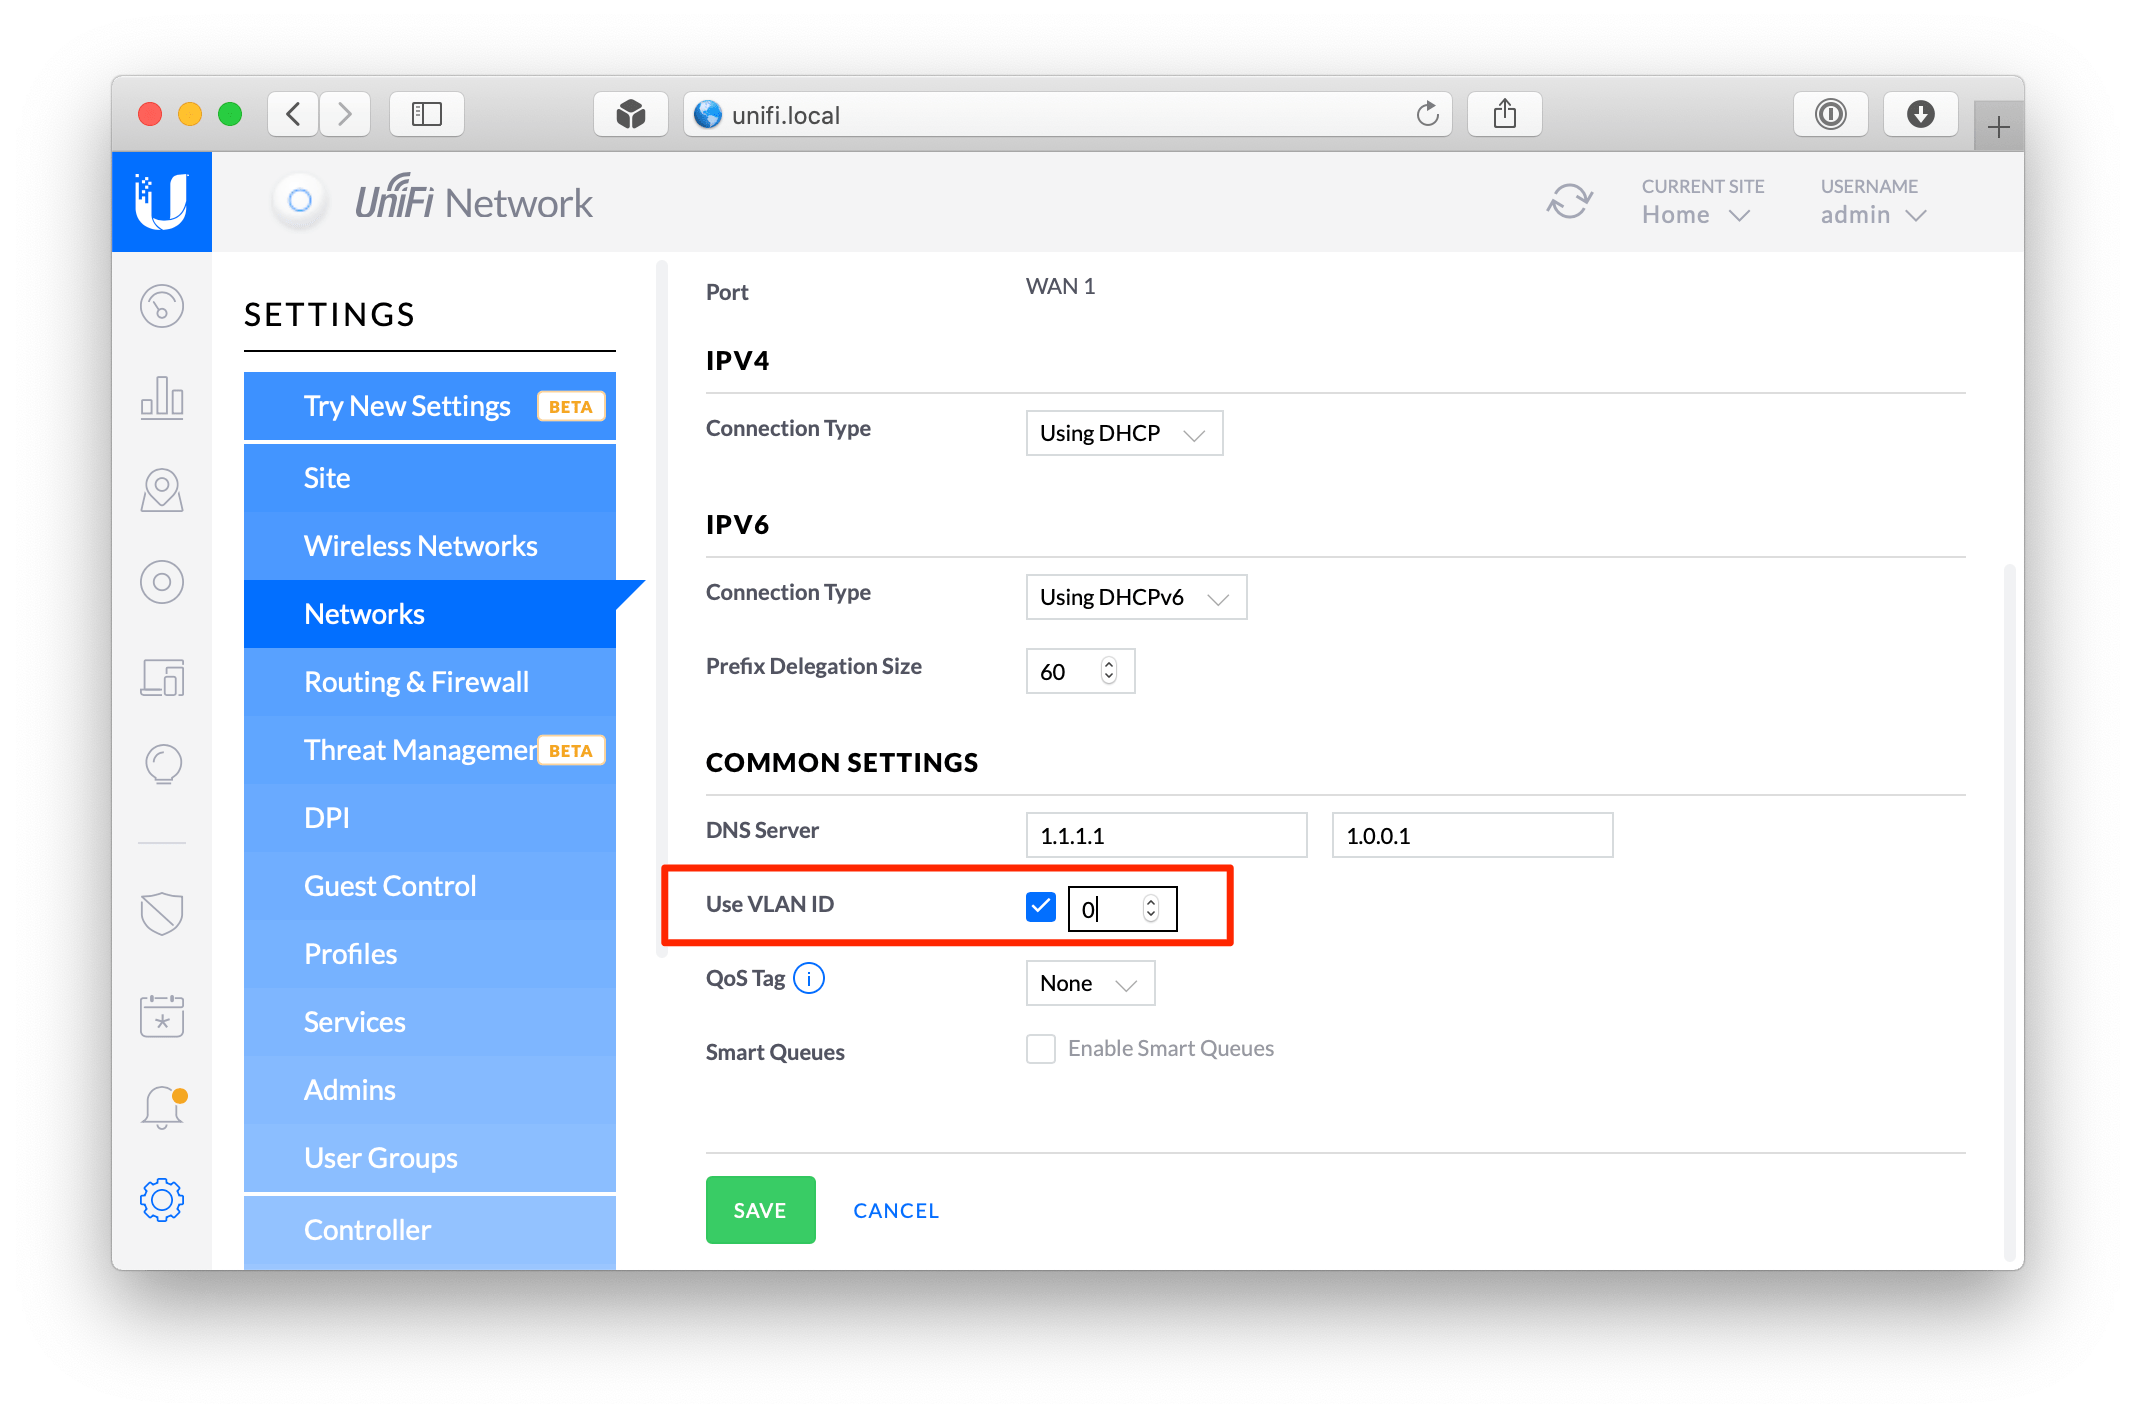
<p>Log into your UniFi controller web interface. Go to <strong>Settings › Networks › WAN › Common Settings</strong> and enable <strong>Use VLAN ID</strong> and set it to <code class="language-plaintext highlighter-rouge">0</code>
<img src="/images/2020-03-01-bypassing-att-fiber-modem-unifi-usg/unifi-step5.png" alt="screenshot of unifi controller WAN VLAN settings" /></p>

<h4 id="step-6">Step 6</h4>

<p>We need to trick the AT&amp;T Fiber network into thinking your USG is actually the RG. To do that, we’re going to spoof the USG’s MAC address to match the RG’s. The MAC address spoof feature isn’t present in the UniFi controller web interface, so we need to edit the <code class="language-plaintext highlighter-rouge">config.gateway.json</code> file directly.</p>

<div class="language-shell highlighter-rouge"><div class="highlight"><pre class="highlight"><code><span class="nv">$ </span>ssh admin@10.0.1.5
<span class="nv">$ </span><span class="nb">cd</span> /usr/lib/unifi/data/sites/default/
<span class="nv">$ </span>nano config.gateway.json
</code></pre></div></div>

<p>It should open a blank file. If it’s not blank, then you probably already know what you’re doing 🙂 Paste the following code into <code class="language-plaintext highlighter-rouge">nano</code>.</p>

<div class="language-json highlighter-rouge"><div class="highlight"><pre class="highlight"><code><span class="p">{</span><span class="w">
	</span><span class="nl">"interfaces"</span><span class="p">:</span><span class="w"> </span><span class="p">{</span><span class="w">
		</span><span class="nl">"ethernet"</span><span class="p">:</span><span class="w"> </span><span class="p">{</span><span class="w">
			</span><span class="nl">"eth0"</span><span class="p">:</span><span class="w"> </span><span class="p">{</span><span class="w">
				</span><span class="nl">"mac"</span><span class="p">:</span><span class="w"> </span><span class="s2">"XX:XX:XX:XX:XX:XX"</span><span class="w">
			</span><span class="p">}</span><span class="w">
		</span><span class="p">}</span><span class="w">
	</span><span class="p">}</span><span class="w">
</span><span class="p">}</span><span class="w">
</span></code></pre></div></div>

<aside class="warn"><strong>Note:</strong> Replace <code class="language-plaintext highlighter-rouge">XX:XX:XX:XX:XX:XX</code> with the MAC address from your rooted device.</aside>

<p>To save the file, press <span class="keyboard">Ctrl</span> <span class="keyboard">O</span> then <span class="keyboard">Ctrl</span> <span class="keyboard">X</span>. Now set appropriate file permissions.</p>

<div class="language-shell highlighter-rouge"><div class="highlight"><pre class="highlight"><code><span class="nv">$ </span><span class="nb">chown </span>unifi:unifi config.gateway.json
</code></pre></div></div>

<h4 id="step-7">Step 7</h4>

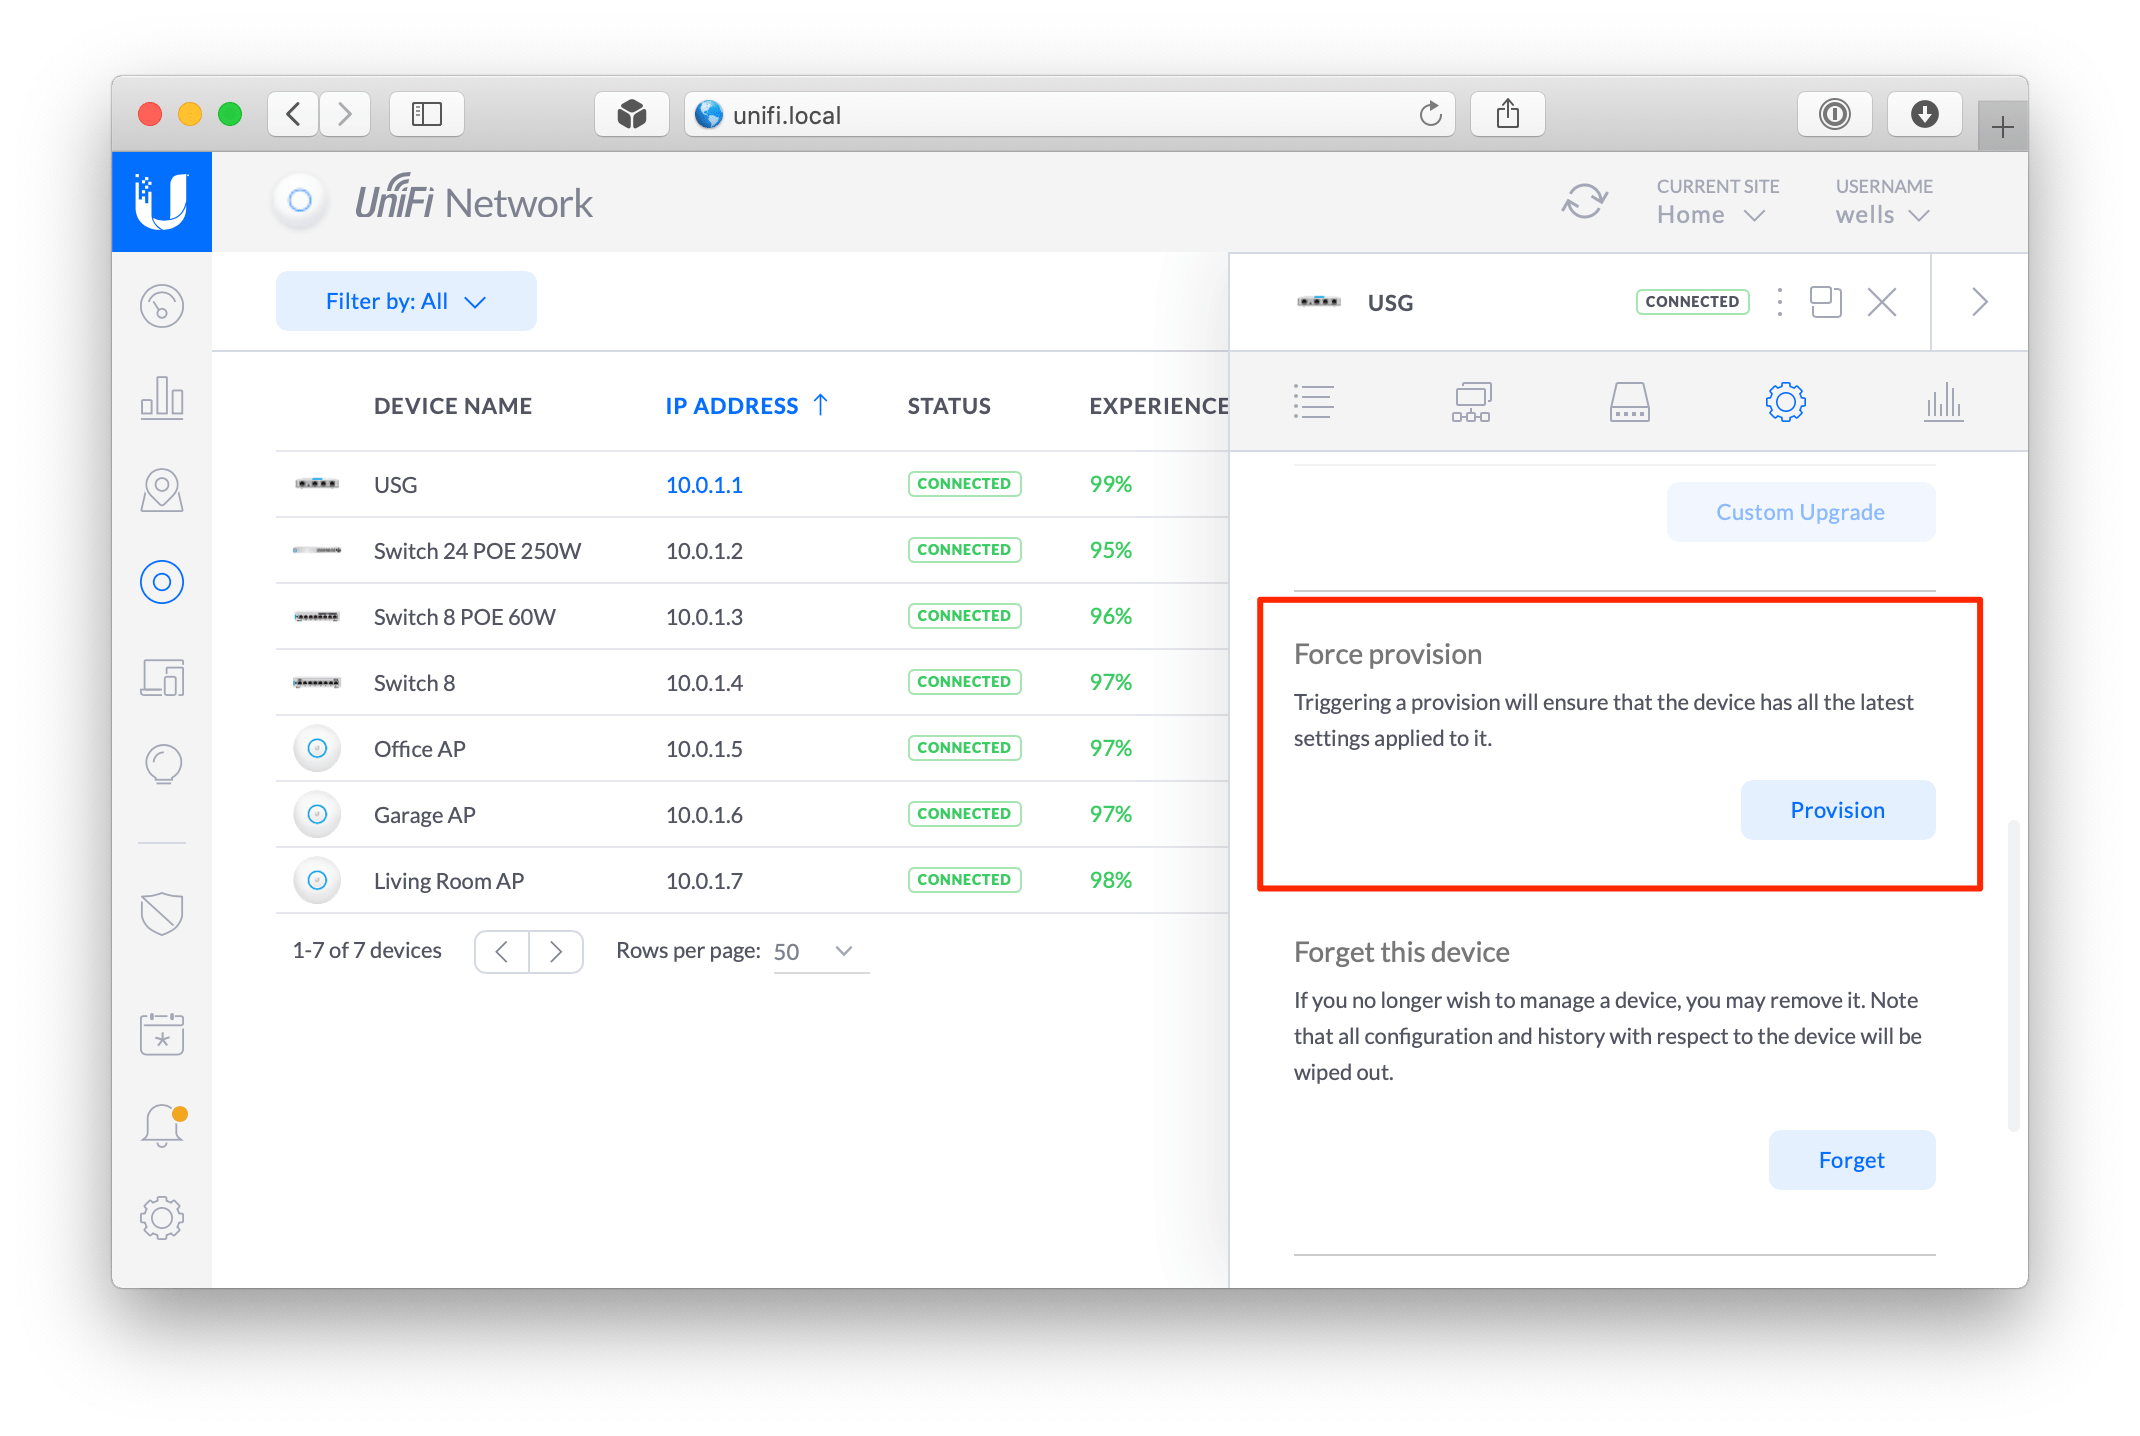
<p>We’re in the home stretch! In the UniFi Controller web interface, go to <strong>Devices › USG › Config › Manage Device</strong> and click the <strong>Provision</strong> button under Force Provision.
<img src="/images/2020-03-01-bypassing-att-fiber-modem-unifi-usg/unifi-step7.png" alt="screenshot of unifi controller device settings" /></p>

<p>While you’re waiting for your USG to provision, unplug the RG from the ONT and USG, and plug the Ethernet cable coming out of the ONT into the WAN port on your USG.</p>

<p>After about 5 minutes, reboot your USG (unplug and plug it back in). Once it’s back online, try to browse the Web. It should work! If it does, go ahead and throw your thicc boi RG in a storage bin or something.</p>

<p>You can confirm it’s working by SSHing into the USG.</p>

<div class="language-shell highlighter-rouge"><div class="highlight"><pre class="highlight"><code><span class="nv">$ </span>ssh admin@10.0.1.1 <span class="c"># the IP of your USG</span>
<span class="nv">$ </span><span class="nb">tail</span> <span class="nt">-n</span> 100 <span class="nt">-f</span> /var/log/messages | <span class="nb">grep </span>wpa_supplicant
</code></pre></div></div>

<p>If you see output like this, then it’s definitely working!</p>

<div class="language-shell highlighter-rouge"><div class="highlight"><pre class="highlight"><code>...
Mar  1 17:24:18 USG wpa_supplicant[5150]: eth0: CTRL-EVENT-EAP-PEER-CERT <span class="nv">depth</span><span class="o">=</span>0 <span class="nv">subject</span><span class="o">=</span><span class="s1">'/C=US/ST=Michigan/L=Southfield/O=ATT Services Inc/OU=OCATS/CN=aut03pltnca.pltnca.sbcglobal.net'</span> <span class="nb">hash</span><span class="o">=</span>XXXXXXXXXXXXXXXXXXXXXXXXXXXXXXXXXXXXXXXXXXXXXXXXXXXXXXXXXXXXXXXX
Mar  1 17:24:18 USG wpa_supplicant[5150]: eth0: CTRL-EVENT-EAP-PEER-ALT <span class="nv">depth</span><span class="o">=</span>0 DNS:aut03pltnca.pltnca.sbcglobal.net
Mar  1 17:24:57 USG wpa_supplicant[5150]: eth0: CTRL-EVENT-EAP-SUCCESS EAP authentication completed successfully
Mar  1 17:24:57 USG wpa_supplicant[5150]: eth0: CTRL-EVENT-CONNECTED - Connection to XX:XX:XX:XX:XX:XX completed <span class="o">[</span><span class="nb">id</span><span class="o">=</span>0 <span class="nv">id_str</span><span class="o">=]</span>
...
</code></pre></div></div>

<h2 id="additional-resources">Additional resources</h2>

<ul>
  <li><a href="https://www.dslreports.com/forum/r32391619-">AntiTrust’s guide on DSLReports</a> - most of this guide is adapted from his great work!</li>
  <li><a href="https://github.com/bypassrg/att">Guide for rooting NVG510 and NVG589</a></li>
  <li><a href="https://www.ebay.com/sch/maczrool/m.html?_nkw=&amp;_armrs=1&amp;_ipg=&amp;_from=&amp;mkcid=1&amp;mkrid=711-53200-19255-0&amp;siteid=0&amp;campid=5338674798&amp;customid=&amp;toolid=10001&amp;mkevt=1">maczrool on eBay</a> (I bought my certs from him)</li>
  <li><a href="https://www.dslreports.com/forum/r31900599-ATT-TrueBridge-Mode-for-for-Ubiquity-Security-Gateway-USG~start=600">DSLReports forum thread where I learned that this actually works on USG</a> <em>(previously it seemed it only worked on EdgeRouters and possibly UDM via Docker)</em></li>
</ul>]]></content><author><name>Wells Riley</name></author><category term="homelab" /><category term="guide" /><summary type="html"><![CDATA[Connect your UniFi USG directly to your AT&T Fiber optical terminal for true bridge mode--and ditch the huge AT&T modem.]]></summary><media:thumbnail xmlns:media="http://search.yahoo.com/mrss/" url="https://wells.ee/images/2020-08-05-bypassing-att-fiber-modem-udmp/og.jpg" /><media:content medium="image" url="https://wells.ee/images/2020-08-05-bypassing-att-fiber-modem-udmp/og.jpg" xmlns:media="http://search.yahoo.com/mrss/" /></entry><entry><title type="html">Powering a Sonos Play:1 with a USB-C battery pack</title><link href="https://wells.ee/journal/2019-05-11-usb-c-sonos-hack/" rel="alternate" type="text/html" title="Powering a Sonos Play:1 with a USB-C battery pack" /><published>2019-05-11T00:00:00+00:00</published><updated>2019-05-11T00:00:00+00:00</updated><id>https://wells.ee/journal/usb-c-sonos-hack</id><content type="html" xml:base="https://wells.ee/journal/2019-05-11-usb-c-sonos-hack/"><![CDATA[<p><em>As an eBay Partner, I may be compensated if you make a purchase.</em></p>

<p>With summer approaching, we’ve been spending more and more time outside in the yard. We recently upgraded our media center with a <a href="https://www.amazon.com/gp/product/B07D494MV1/ref=as_li_tl?ie=UTF8&amp;tag=wr088e-20&amp;camp=1789&amp;creative=9325&amp;linkCode=as2&amp;creativeASIN=B07D494MV1&amp;linkId=1da651b5125122283023507fd6cd4b94">Sonos Beam</a> and I wanted to stay in the Sonos ecosystem with other speakers around my house-including outdoors.</p>

<p>My first surprise was that Sonos doesn’t have a battery-powered speaker. I sort of assumed based on the ubiquity of cheap Bluetooth speakers that Sonos would have a high-end version. Nope. Next, I checked the aftermarket for a battery dock or external battery add-on. No dice.</p>

<aside class="info"><strong>Note:</strong> in September 2019 Sonos announced the <a href="https://www.amazon.com/gp/product/B07W95RBZM/ref=as_li_tl?ie=UTF8&amp;tag=wr088e-20&amp;camp=1789&amp;creative=9325&amp;linkCode=as2&amp;creativeASIN=B07W95RBZM&amp;linkId=0f676d3389db51277100ed03747789fa">Sonos Move</a>–-a genuine portable Sonos! However at $400 plus tax, it’s a far cry from the $120 I spent on mine <a href="https://www.ebay.com/sch/i.html?_from=R40&amp;_trksid=p2380057.m570.l1313.TR12.TRC2.A0.H0.Xsonos+play+1.TRS0&amp;_nkw=sonos+play+1&amp;_sacat=0&amp;mkcid=1&amp;mkrid=711-53200-19255-0&amp;siteid=0&amp;campid=5338674798&amp;customid=&amp;toolid=10001&amp;mkevt=1">on eBay</a>, which has roughly the same battery life, no built-in voice assistant (a plus, IMO), and comes in white! No bluetooth unfortunately, though I hardly miss it.</aside>

<h2 id="getting-creative">Getting creative</h2>

<p>In my search, I found a post by James Callaghan where he added a microUSB port to his <a href="https://www.amazon.com/gp/product/B00EWCUK98/ref=as_li_tl?ie=UTF8&amp;tag=wr088e-20&amp;camp=1789&amp;creative=9325&amp;linkCode=as2&amp;creativeASIN=B00EWCUK98&amp;linkId=7202888a8e3fed5aa60c59729c9d0509">Play:1</a> with a boost converter to run off a standard 5v battery pack. One downside he discovered was the relatively low max volume due to the boost converter stepping down the amperage to get the necessary 24v out of the 5v USB supply.</p>

<p>I had an idea. <a href="https://en.wikipedia.org/wiki/USB_hardware#PD">USB-C Power Delivery</a> is everywhere these days, and can deliver 20v at up to 5a. I did some searching and found a <a href="https://www.ebay.com/sch/i.html?_from=R40&amp;_trksid=p2334524.m570.l1313.TR0.TRC1.A0.H0.Xusb+c+decoy.TRS1&amp;_nkw=usb+c+decoy&amp;_sacat=0&amp;LH_TitleDesc=0&amp;_osacat=0&amp;_odkw=sonos+play+1&amp;mkcid=1&amp;mkrid=711-53200-19255-0&amp;siteid=0&amp;campid=5338674798&amp;customid=&amp;toolid=10001&amp;mkevt=1">USB-C PD “decoy”</a> board that has a USB-C port and a chip that tricks a PD-compatible charger into thinking it’s charging a device at 20v.</p>

<p><img src="/images/2019-05-11-usb-c-sonos-hack/usb.png" alt="usb-c pd decoy board" /></p>

<p>It works perfectly! Now I can bring my Sonos out into the yard with a 26800mAh battery pack and it lasts pretty much all day. Instructions below if you’re interested in making your own!</p>

<h2 id="instructions">Instructions</h2>

<p><img src="/images/2019-05-11-usb-c-sonos-hack/sonos0.jpg" alt="step 0" /></p>

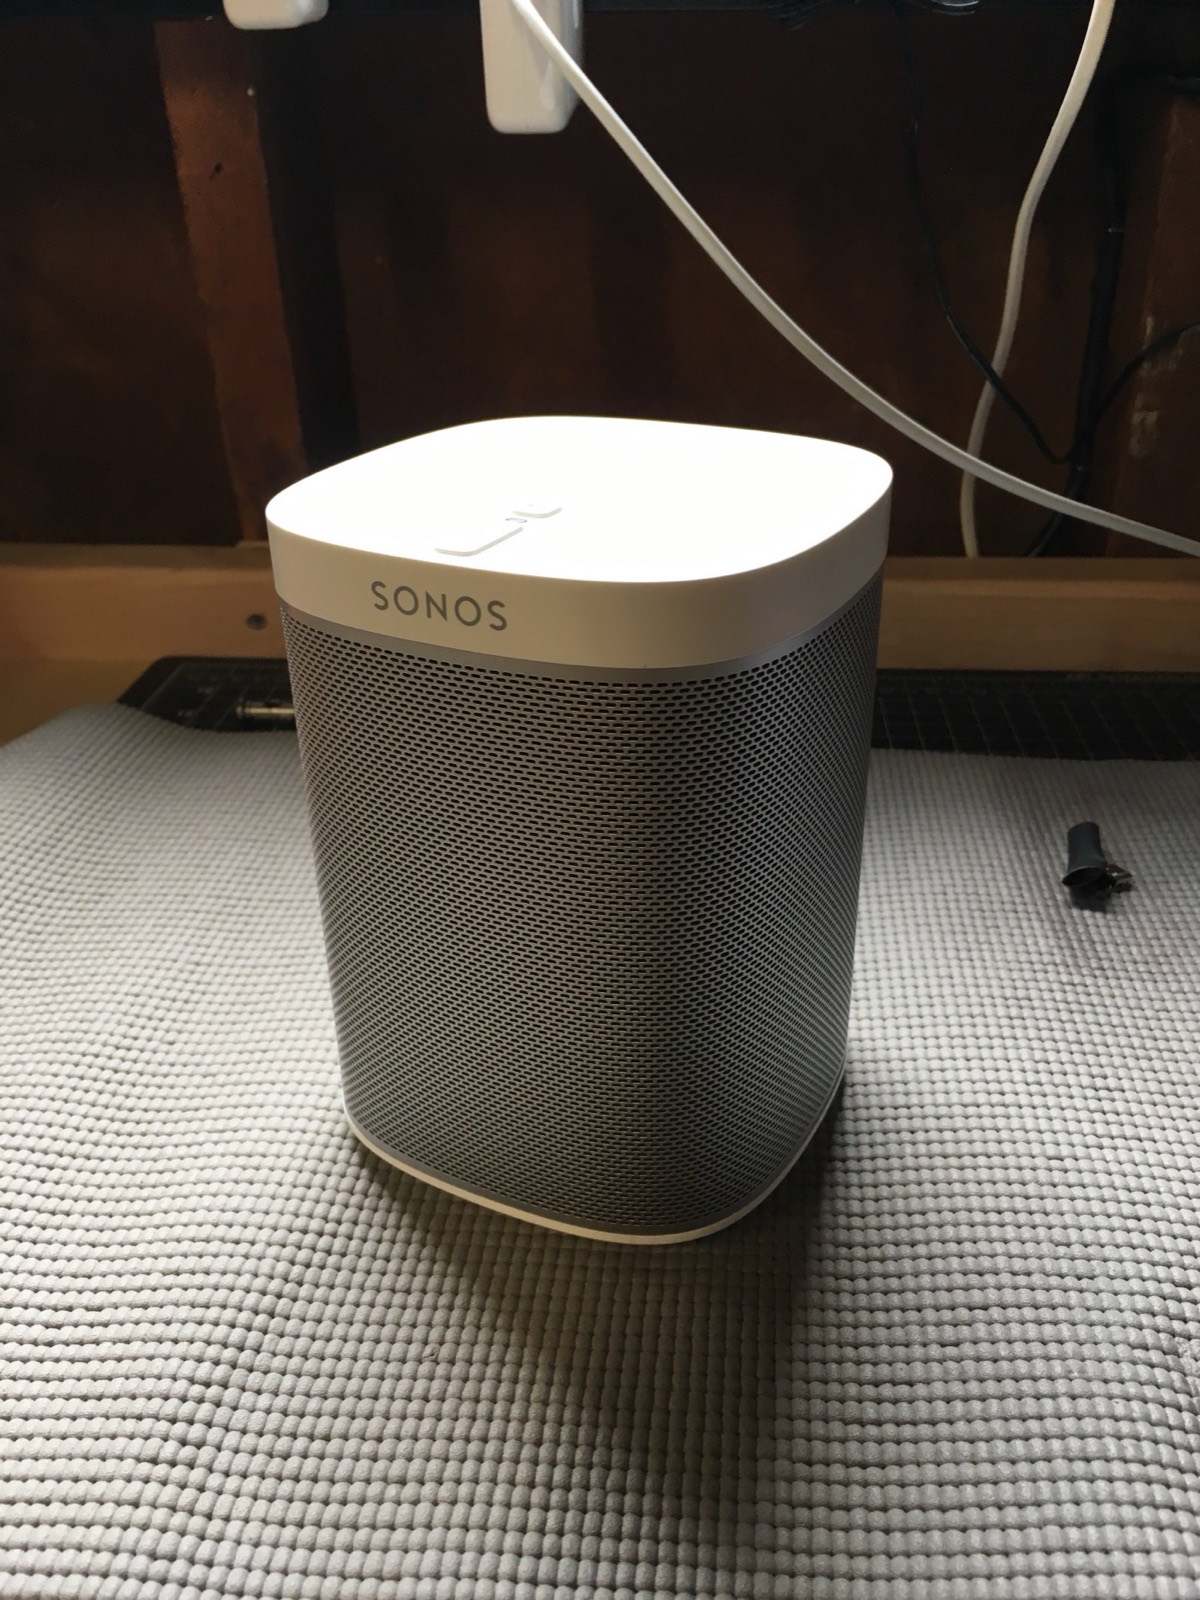
<p>Get yourself a Sonos Play:1 that you want to hack. <em>This will void your warranty!</em> So be careful and take your time. I’m not responsible for bricked Sonoses :)</p>

<ol>
  <li>
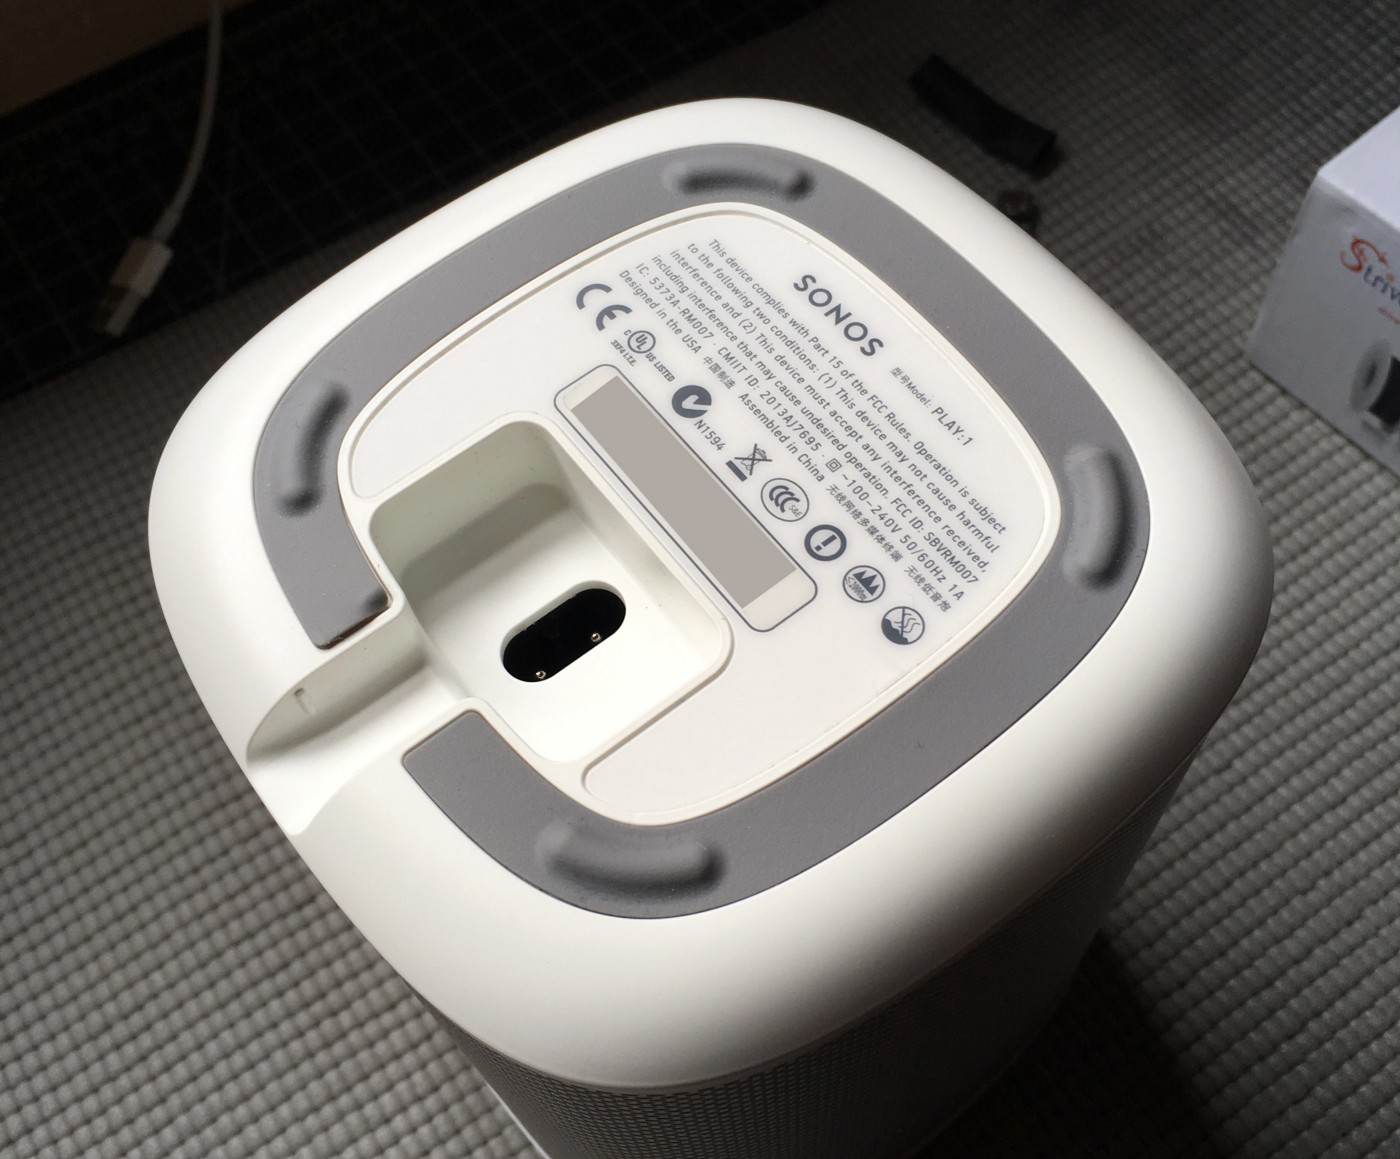
    <p>Flip over your Play:1
<img src="/images/2019-05-11-usb-c-sonos-hack/sonos1.jpg" alt="step 1" /></p>
  </li>
  <li>
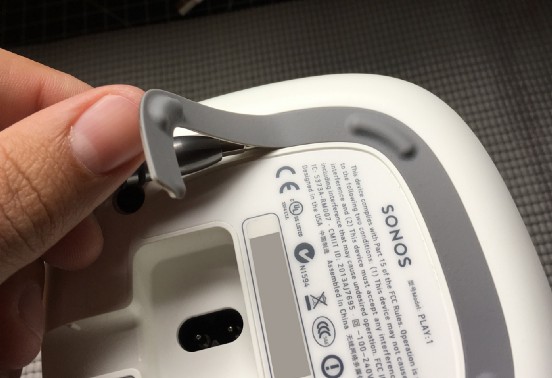
    <p>Peel off the rubberized foot strip with a thin screwdriver or spudger. Go slowly to avoid damaging the adhesive. If you do it correctly, it’ll go back on at the end looking brand new.
<img src="/images/2019-05-11-usb-c-sonos-hack/sonos2.jpg" alt="step 2" /></p>
  </li>
  <li>
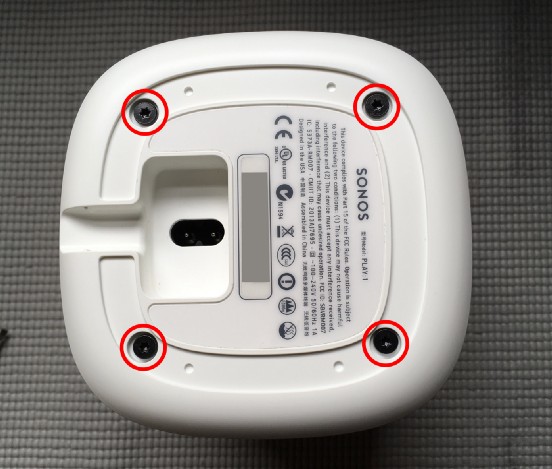
    <p>Remove the four Torx #10 screws from the base, then remove the base by lifting straight up.
<img src="/images/2019-05-11-usb-c-sonos-hack/sonos3.jpg" alt="step 3" /></p>
  </li>
  <li>
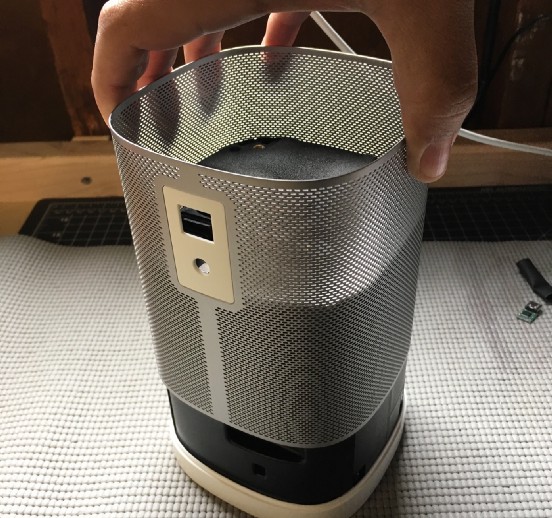
    <p>Remove the metal screen by sliding it straight up and off the unit. You may need to squeeze the sides a bit to clear the ethernet port and grounding lug.
<img src="/images/2019-05-11-usb-c-sonos-hack/sonos4.jpg" alt="step 4" /></p>
  </li>
  <li>
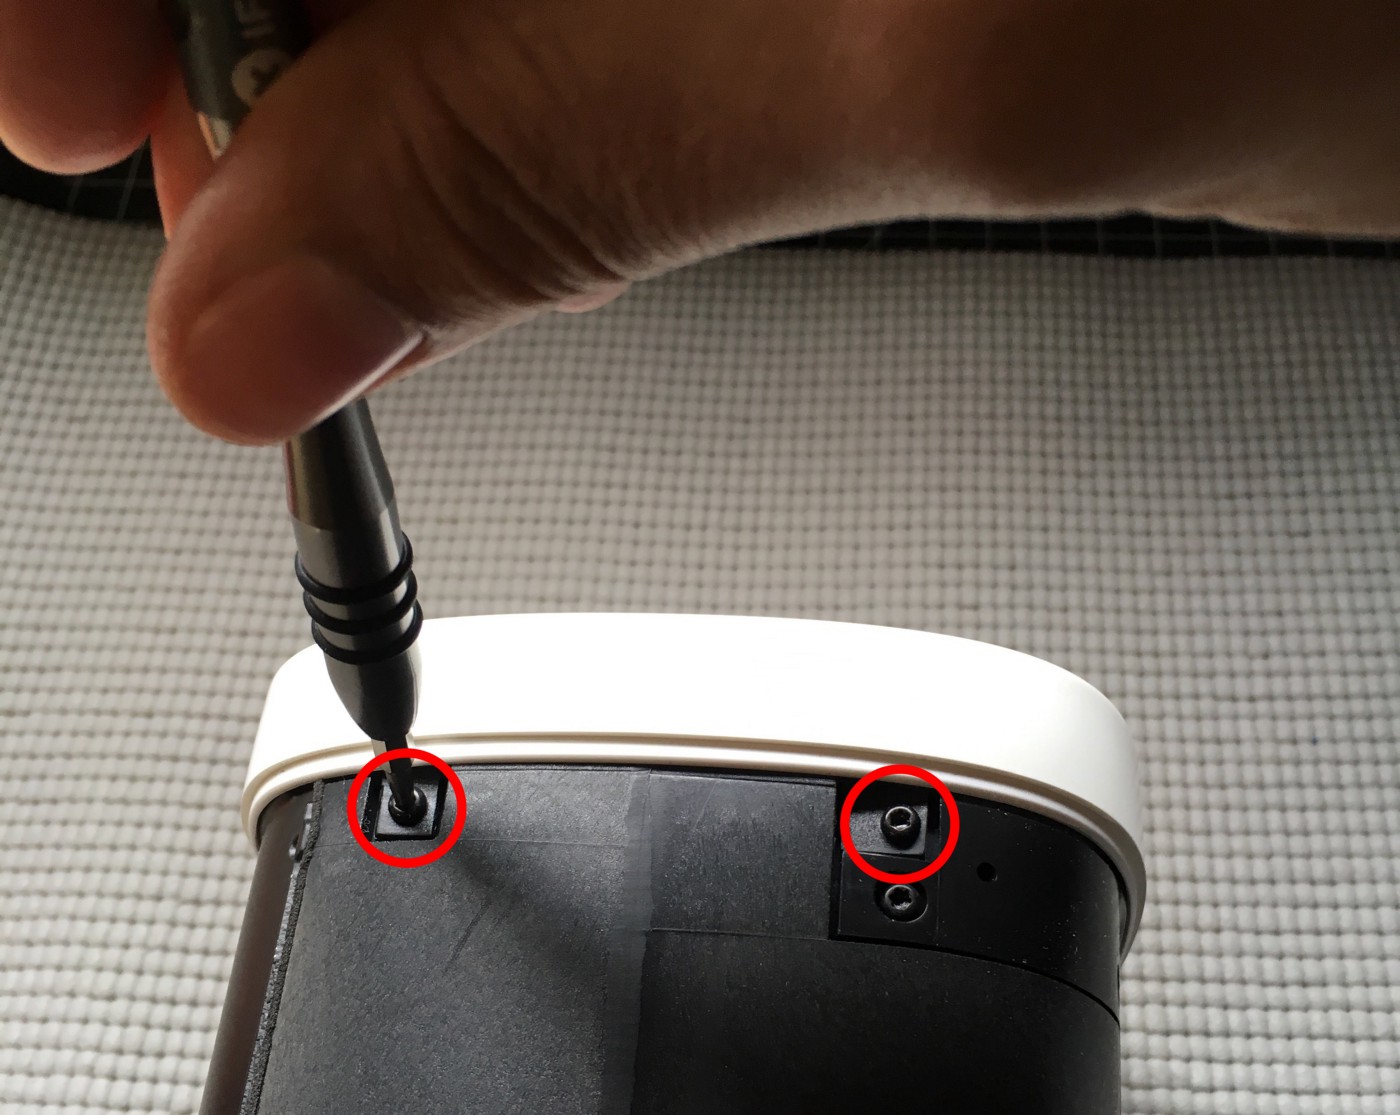
    <p>Flip over the unit and remove the four Torx #9 screws from the sides of the top cover.
<img src="/images/2019-05-11-usb-c-sonos-hack/sonos5.jpg" alt="step 5" /></p>
  </li>
  <li>
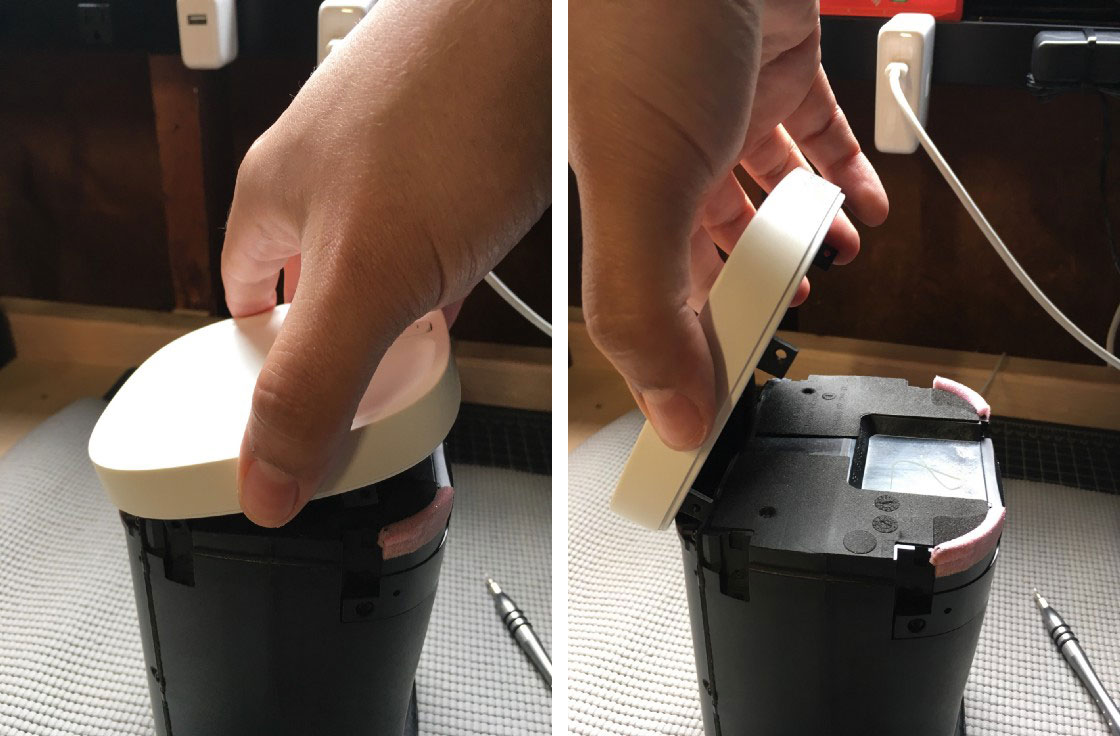
    <p><em>Carefully</em> remove the top cover. It is wedged on tightly with foam and a little bit of adhesive. Don’t yank it off or you might damage the delicate ribbon cable connecting the buttons and indicator light. Once it’s loose, tilt it up towards the back of the device (away from the speaker).
<img src="/images/2019-05-11-usb-c-sonos-hack/sonos6.jpg" alt="step 6" /></p>
  </li>
  <li>
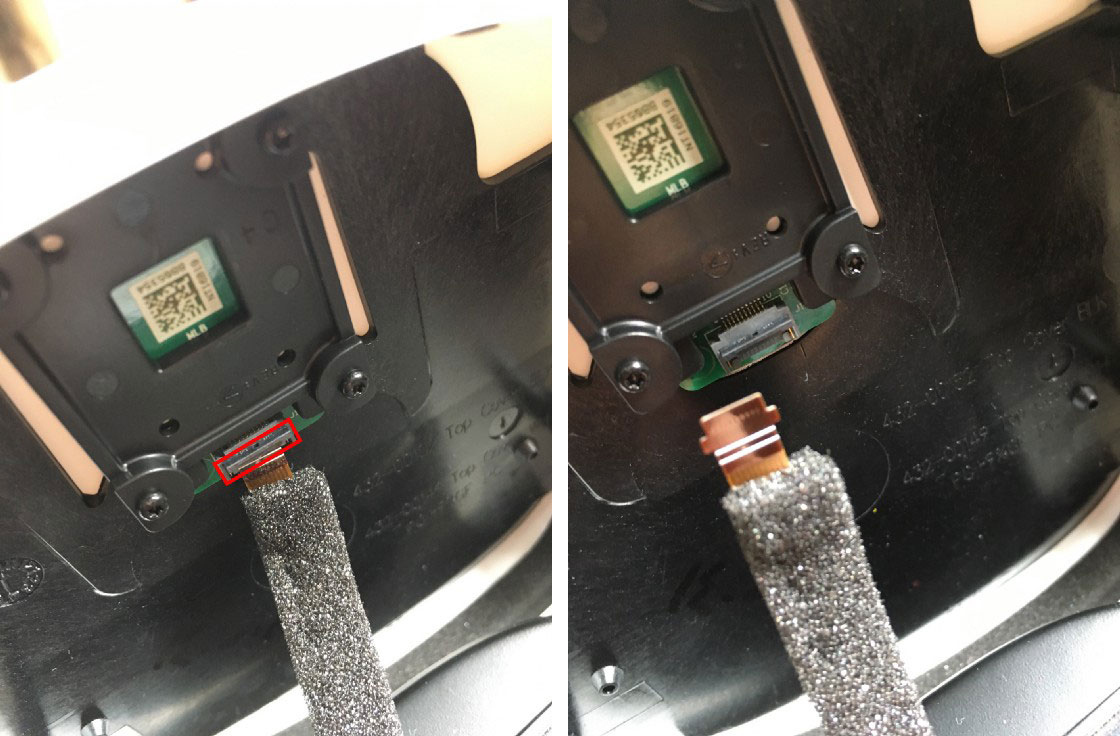
    <p>Unlatch the ribbon cable with your finger. There is a small plastic flap holding the cable in place. Swing it open and the cable will fall out.
Set the top cover aside.
<img src="/images/2019-05-11-usb-c-sonos-hack/sonos7.jpg" alt="step 7" /></p>
  </li>
  <li>
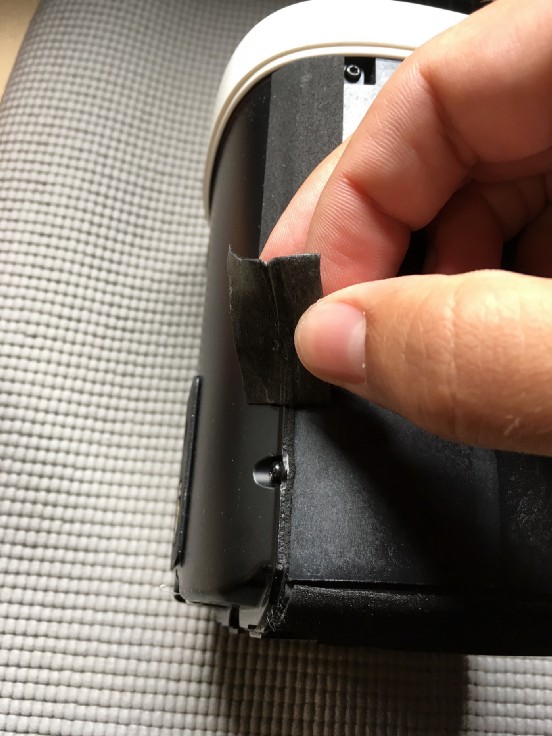
    <p>Flip the unit over so that it’s speaker-side down. Gently peel off the foam tape on either side of the rear cover. <em>Go slowly.</em> It’s easy to tear this tape and ruin it, but it is possible to cleanly remove it in one go. Set the strips aside—we’ll reuse them during reassembly.
Don’t worry if you tear the tape. You can either piece it back together or replace it with vinyl electrical tape if needed.
<img src="/images/2019-05-11-usb-c-sonos-hack/sonos8.jpg" alt="step 8" /></p>
  </li>
  <li>
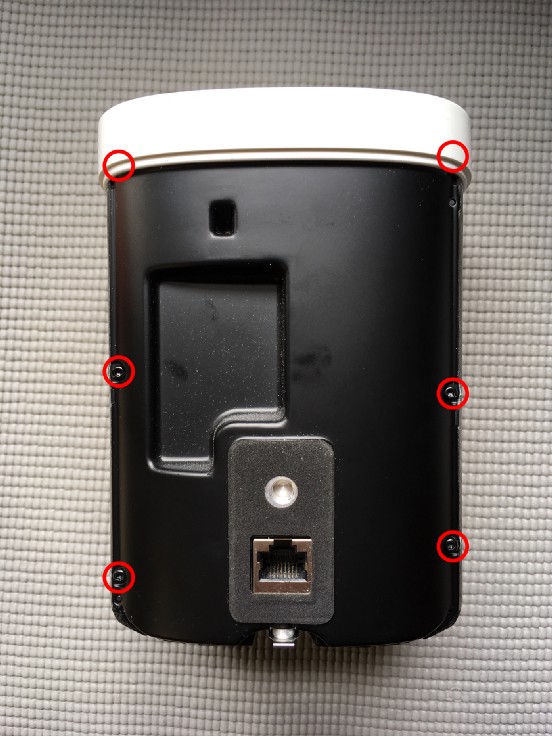
    <p>Remove the six Torx #9 screws from the rear cover and gently pry the rear cover away a few mm from the unit. Don’t pull too far—there are cables connecting the two halves that need to be disconnected first.
<img src="/images/2019-05-11-usb-c-sonos-hack/sonos9.jpg" alt="step 9" /></p>
  </li>
  <li>
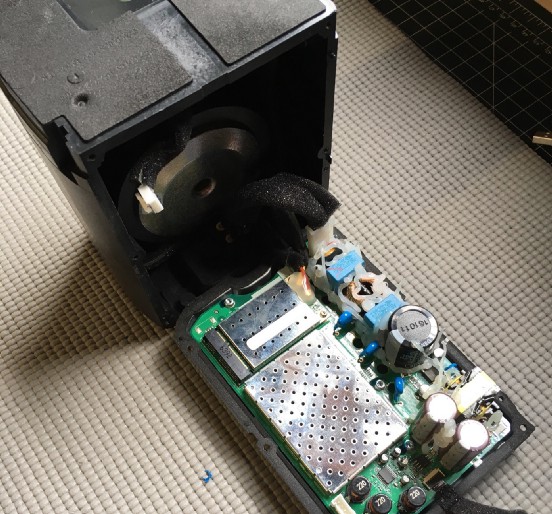
    <p>With your fingers, unlatch the speaker cable near the top of the rear cover. Fold the rear cover down so that the bottom edge of the rear cover is resting against the inside of the main unit.
<img src="/images/2019-05-11-usb-c-sonos-hack/sonos10.jpg" alt="step 10" />
<img src="/images/2019-05-11-usb-c-sonos-hack/sonos10a.jpg" alt="step 10a" /></p>
  </li>
  <li>
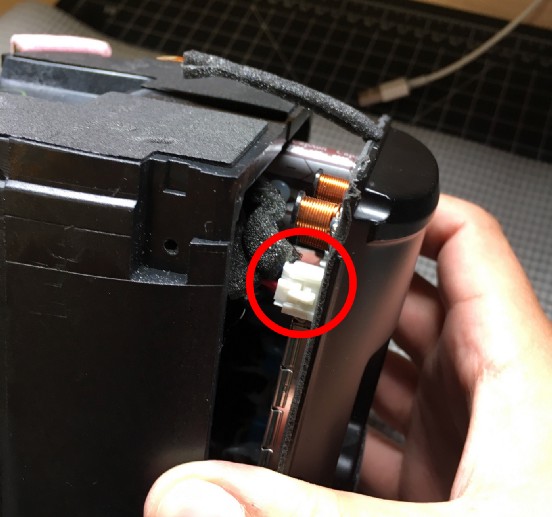
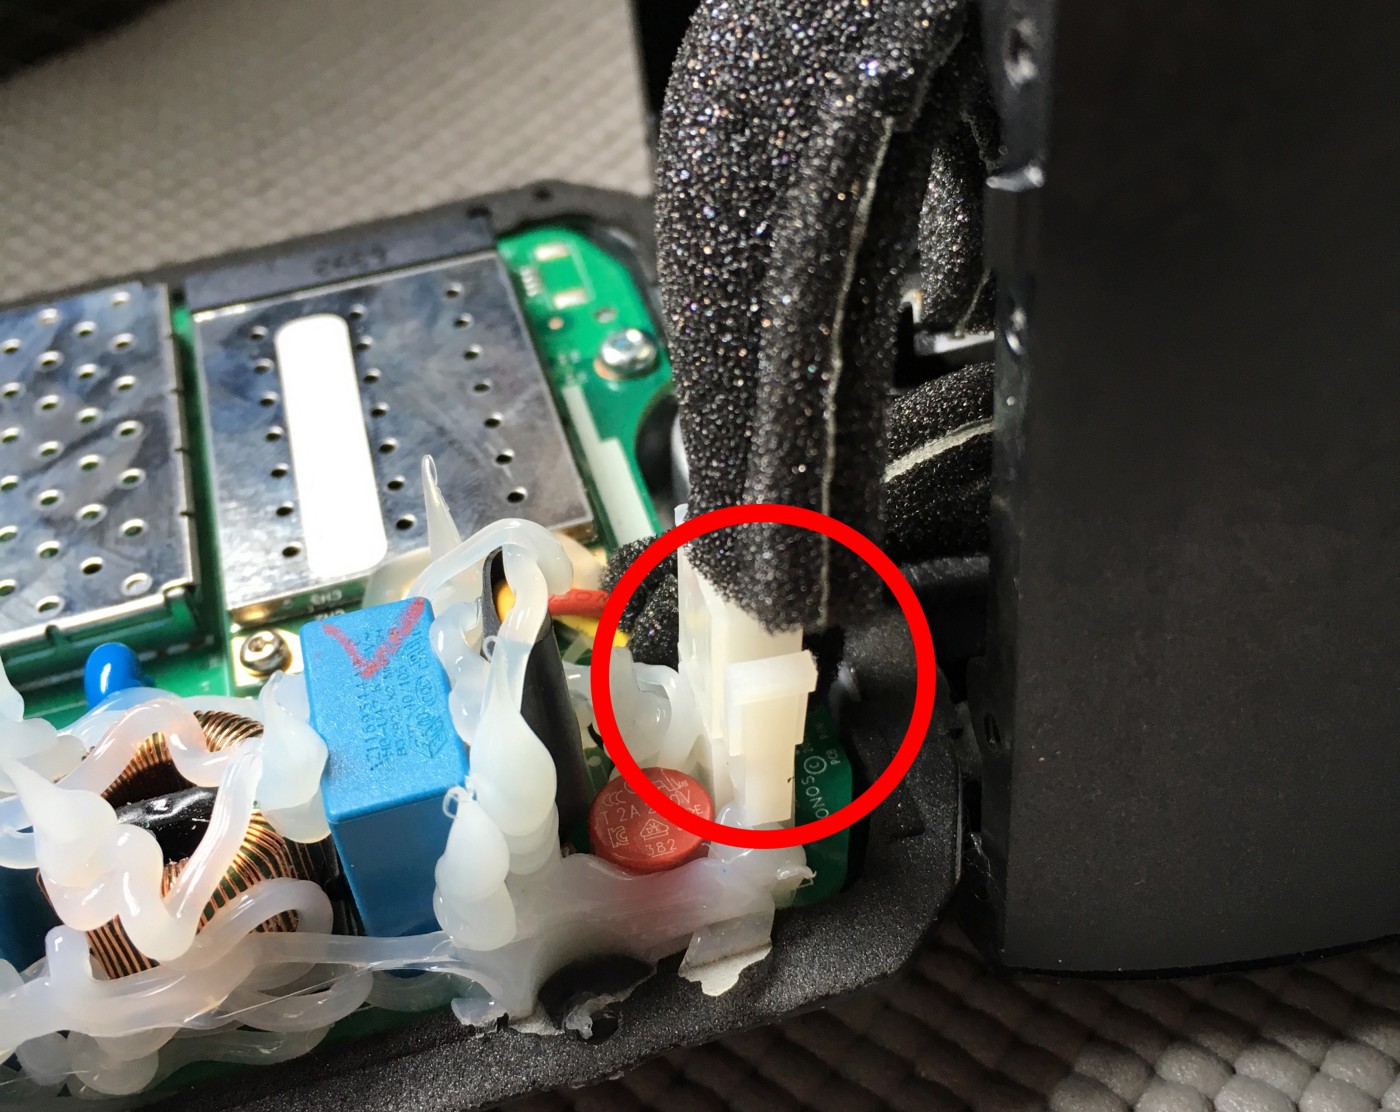
    <p>With your fingers, unlatch the power cable near the bottom of the rear cover.
<img src="/images/2019-05-11-usb-c-sonos-hack/sonos11.jpg" alt="step 11" /></p>
  </li>
  <li>
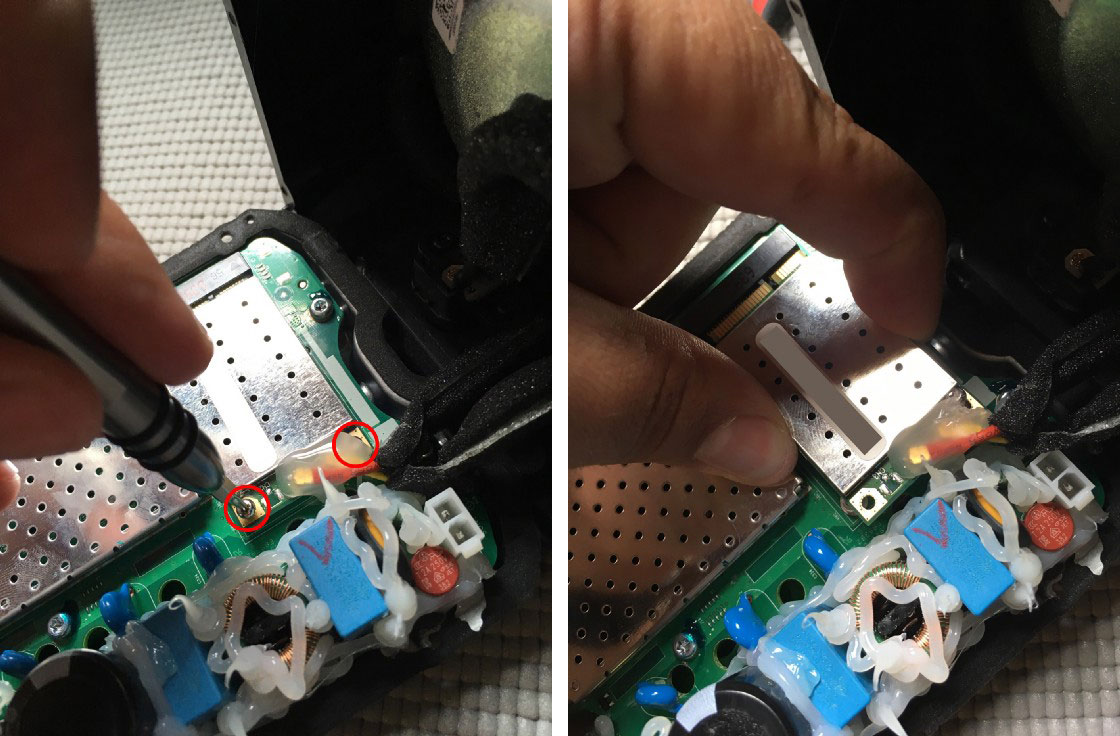
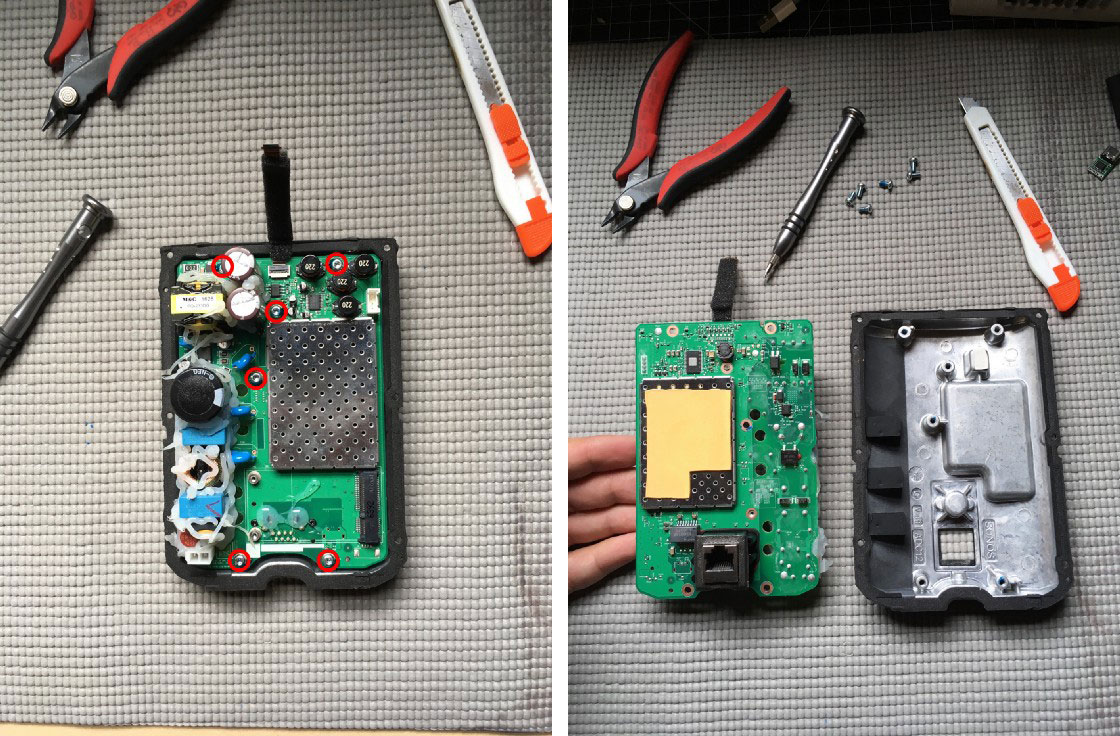
    <p>Remove the two Torx #6 screws securing the Wi-Fi card. If the screws are covered with hot glue, carefully cut the glue away first. Pull the Wi-Fi card straight out from the connector to avoid damaging it.
<img src="/images/2019-05-11-usb-c-sonos-hack/sonos12.jpg" alt="step 12" /></p>
  </li>
  <li>
    <p>Remove the six Torx #10 screws securing the motherboard to the rear case. Gently pry the motherboard out, being careful not to touch the thermal pad on the rear of the heatsink.
<img src="/images/2019-05-11-usb-c-sonos-hack/sonos13.jpg" alt="step 13" /></p>
  </li>
  <li>
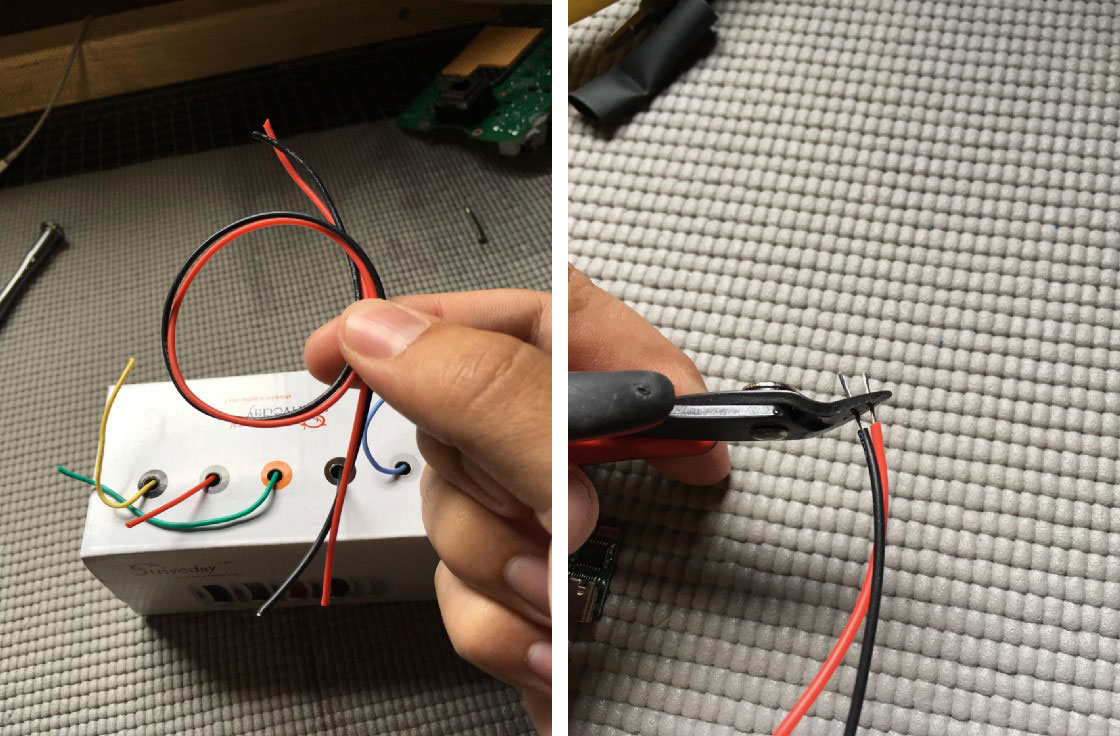
    <p>Strip about 5mm off the ends of a 15cm piece of <a href="https://www.amazon.com/gp/product/B01LH1G2IE/ref=ppx_yo_dt_b_search_asin_title?ie=UTF8&amp;psc=1">24awg silicone stranded wire</a>. You can use any kind of wire you like, but I prefer silicone because it’s easy to work with and very flexible. One black (negative) and one red (positive).
<img src="/images/2019-05-11-usb-c-sonos-hack/sonos14.jpg" alt="step 14" /></p>
  </li>
  <li>
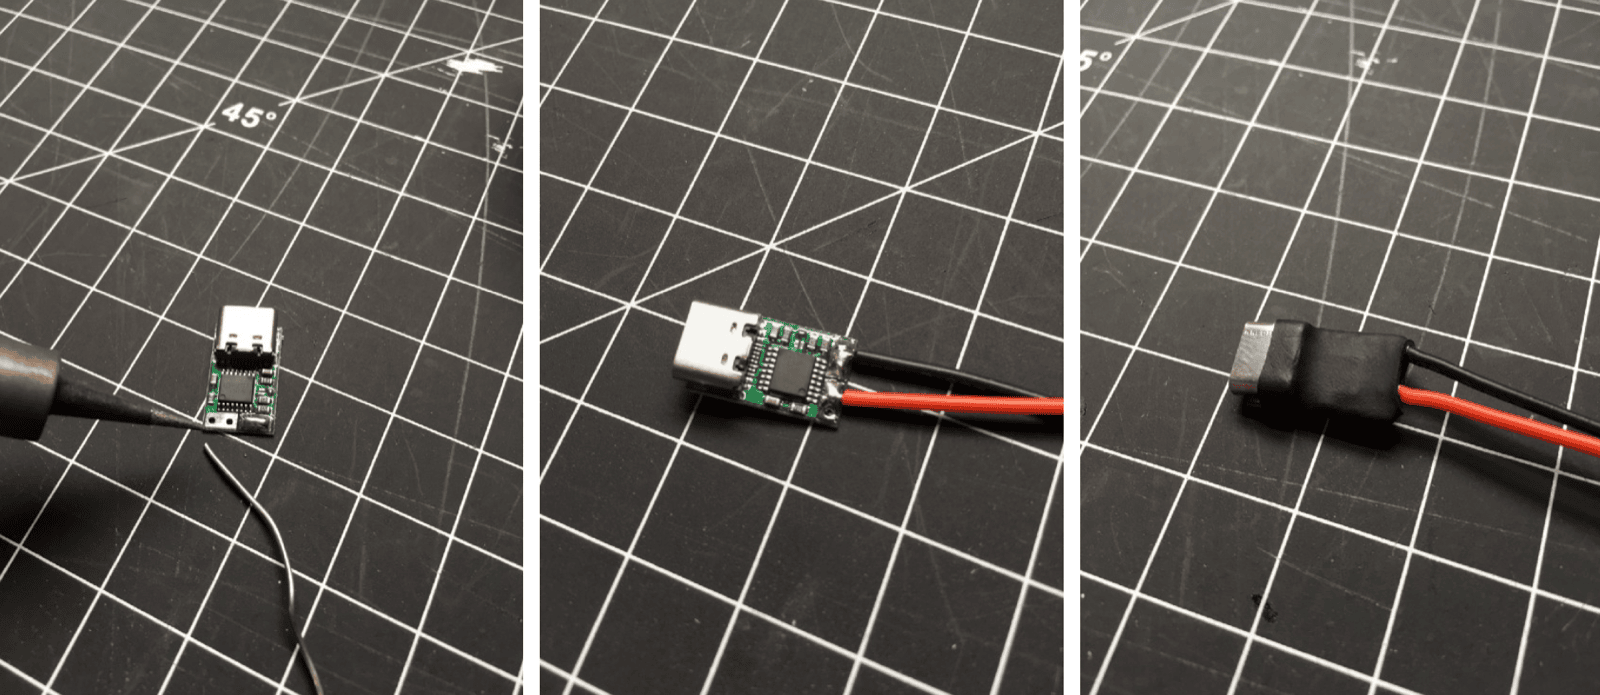
    <p>Flow some solder on the positive and negative pads of the <a href="https://www.ebay.com/itm/Type-C-USB-C-PD2-0-3-0-to-DC-USB-decoy-fast-charge-trigger-Poll-detector-100W-MA/303019627360?ssPageName=STRK%3AMEBIDX%3AIT&amp;var=601955313194&amp;_trksid=p2057872.m2749.l2649">ZYPDS decoy USB-C board</a>, and tin the leads of the silicone wire. Solder them together, then put a small piece of heatshrink tubing over the board and shrink it down.
<img src="/images/2019-05-11-usb-c-sonos-hack/sonos15.png" alt="step 15" /></p>
  </li>
  <li>
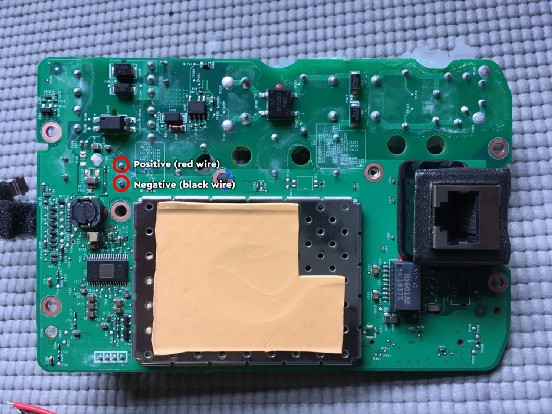
    <p>Solder the other ends of your positive and negative wires to the DC output on the back of the motherboard. Run the wires down towards the ethernet jack and secure with electrical tape.
<img src="/images/2019-05-11-usb-c-sonos-hack/sonos16.jpg" alt="step 16" /></p>
  </li>
  <li>
    <p>Time to make a hole in the rear case to accommodate the USB-C port. I chose to drill out the mounting terminal since I never mount my Sonos speakers. It’s the perfect size for the USB-C port and has the added bonus of not needing to cut the metal screen.
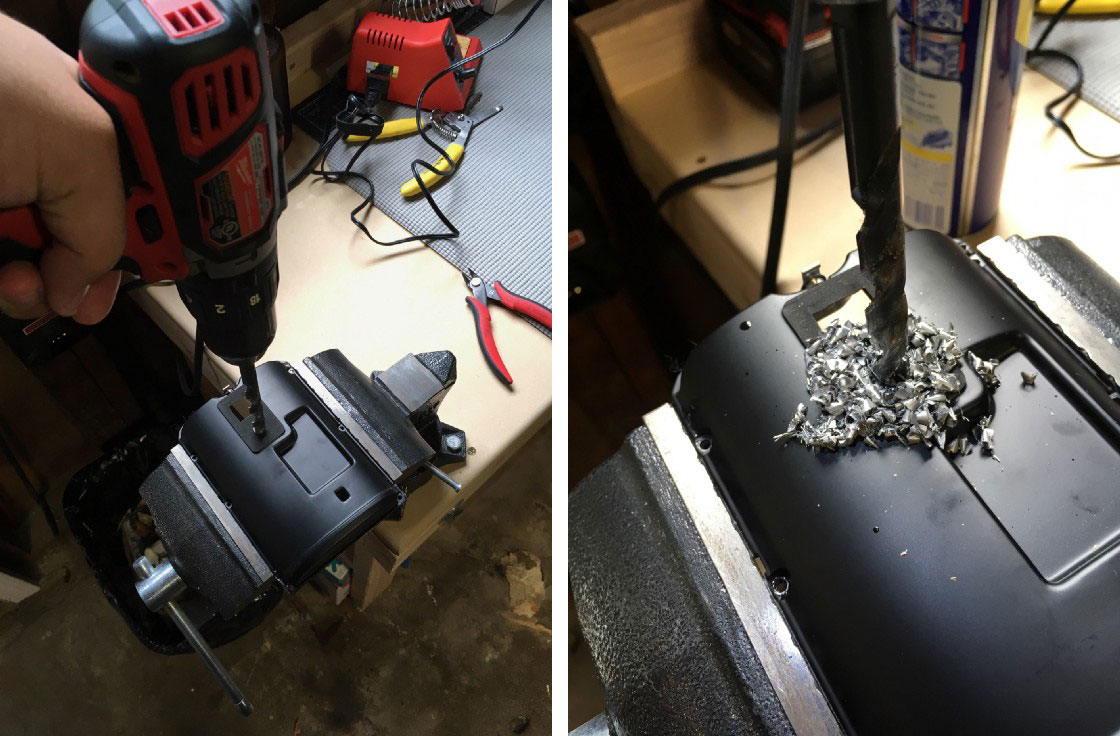
I used a 3/8” wood drill bit with some WD-40 as lubricant. Go slowly! Let gravity do the work. Eventually you’ll break through. Take care to clean up all your chips and the lubricant after you’re done… you don’t want any of the zinc shavings shorting out the electronics!
<img src="/images/2019-05-11-usb-c-sonos-hack/sonos17.jpg" alt="step 17" /></p>
  </li>
  <li>
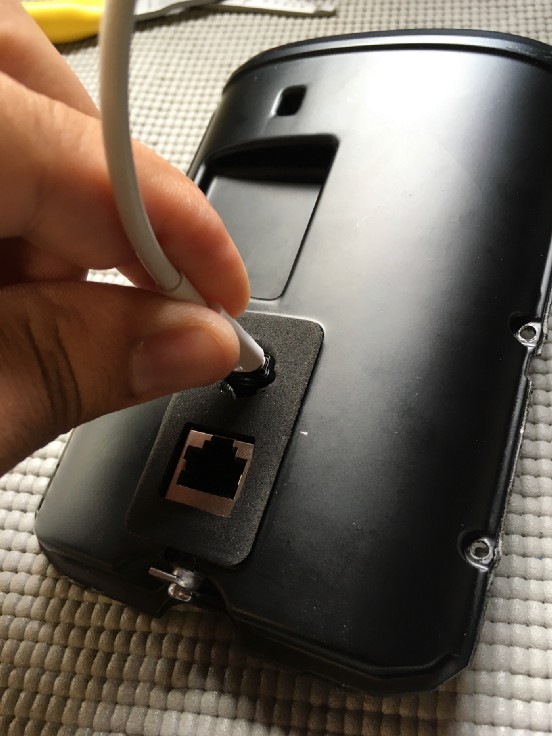
    <p>Time for a dry fit. Feed the USB-C connector through the hole you made. If it fits, center the port in your hole using a spare USB-C lead. Place the motherboard back into the rear case to check the clearance. Fill in the gaps around the connector with hot glue from the outside. Once it’s dry, fill in from the inside as well. Cut the excess glue on the outside flush with the foam.
<img src="/images/2019-05-11-usb-c-sonos-hack/sonos18.jpg" alt="step 18" /></p>
  </li>
  <li>
    <p>Re-assemble the Play:1 following the previous instructions in reverse.</p>
  </li>
  <li>
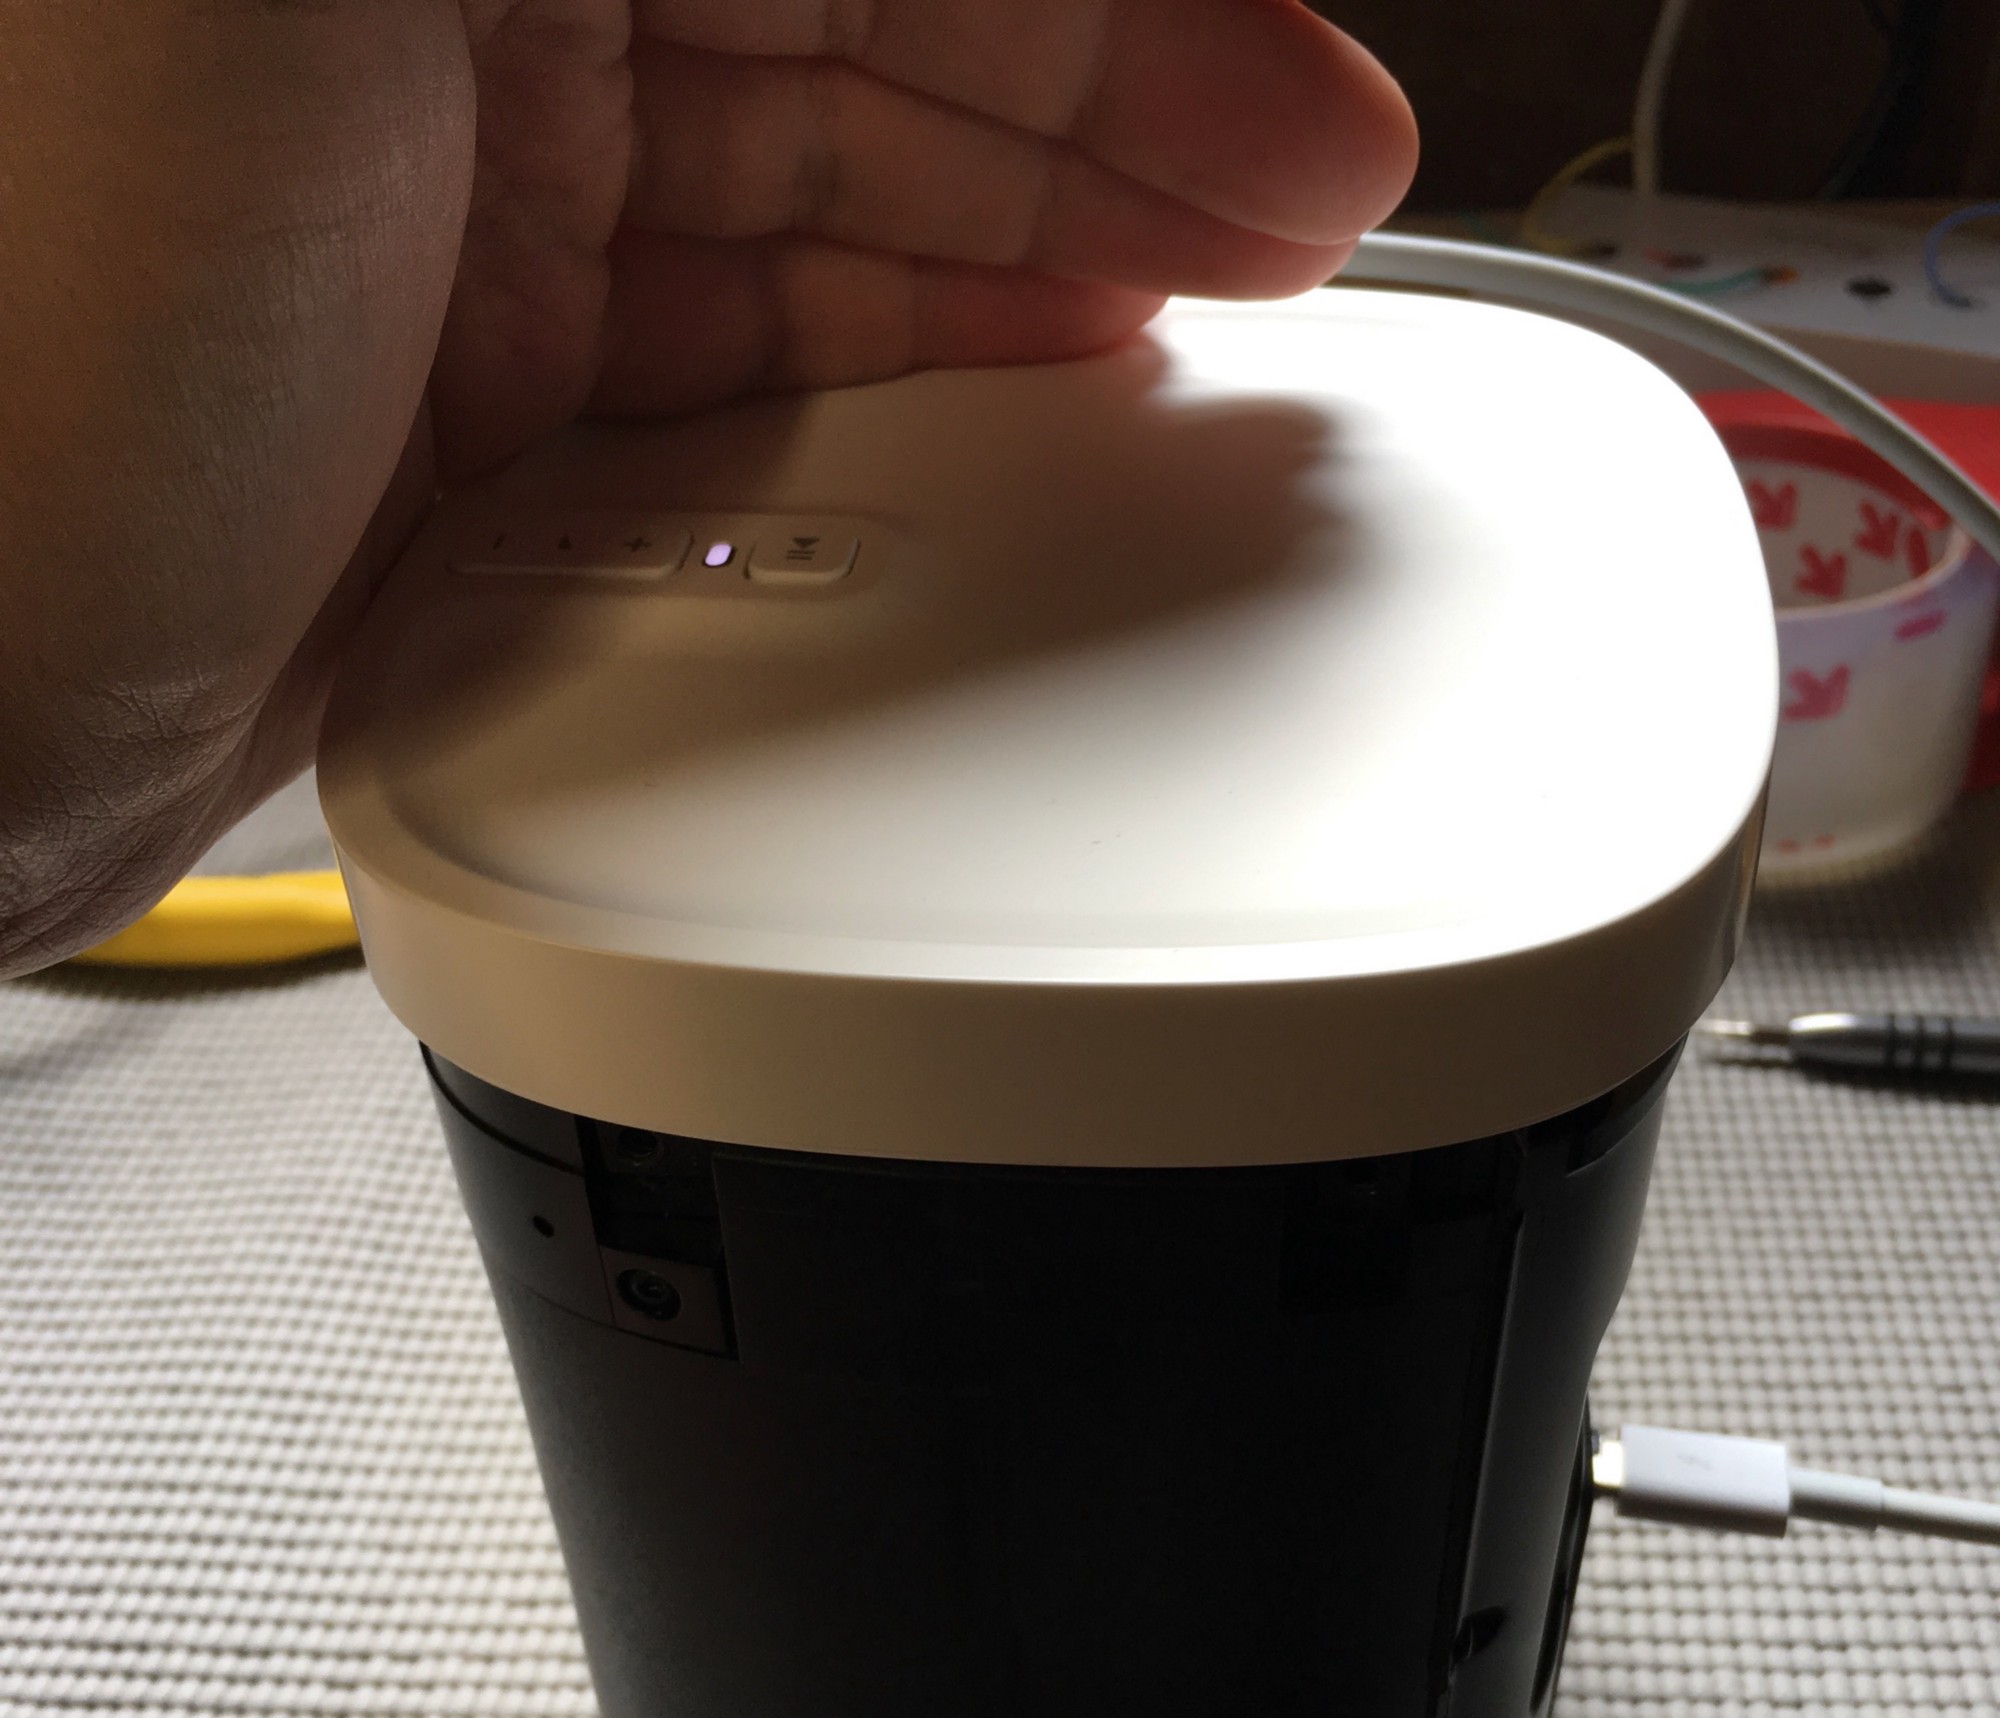
    <p>The moment of truth—time to test it out. Re-attach the ribbon cable to the top case and plug in a USB-C power supply. A white light means it’s working!
<img src="/images/2019-05-11-usb-c-sonos-hack/sonos20.jpg" alt="step 20" /></p>
  </li>
  <li>
    <p>The USB-C port is slightly larger than the mounting hole opening in the plastic. I used a Dremel to widen the hole a bit where the port lined up. It didn’t turn out as clean as I hoped, but fortunately it’s on the back of the device where no one will really see it.
<img src="/images/2019-05-11-usb-c-sonos-hack/sonos21.png" alt="step 21" /></p>
  </li>
</ol>

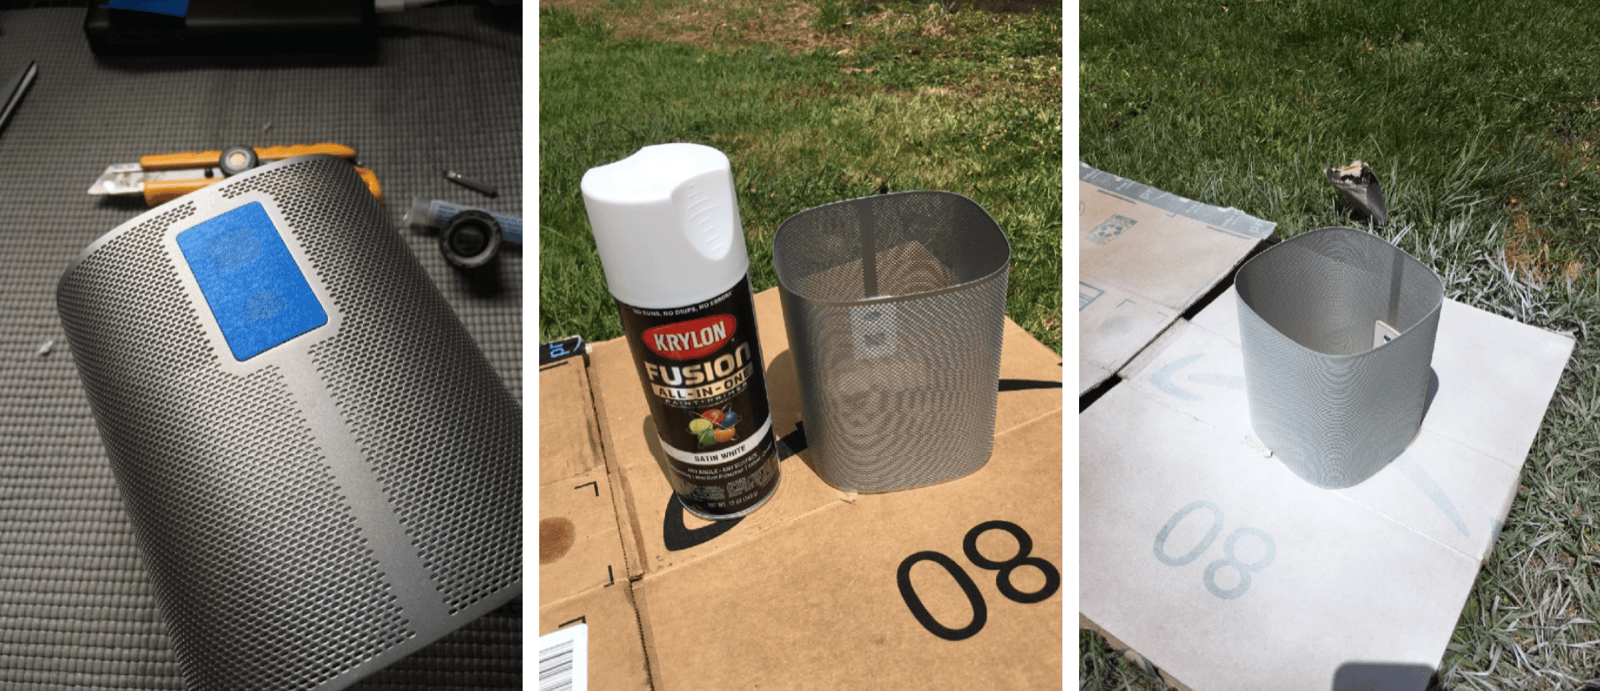
<p>At this point, you’re pretty much done. But I also went a step further by painting the screen white to match the <a href="https://www.sonos.com/en-us/shop/one.html">Sonos One</a> in my living room. I used <a href="https://www.amazon.com/gp/product/B07LFY62XN/ref=ppx_yo_dt_b_search_asin_title?ie=UTF8&amp;psc=1">Krylon Fusion all-in-one White</a> for this project and it matches almost perfectly.</p>

<h2 id="result">Result</h2>
<p>I’m very happy with how these turned out (oh, I made two!) They work brilliantly in the yard. I also set up <a href="https://github.com/bandesz/AirConnect-Synology">AirConnect</a> on my <a href="https://www.amazon.com/gp/product/B075N1Z9LT/ref=as_li_tl?ie=UTF8&amp;tag=wr088e-20&amp;camp=1789&amp;creative=9325&amp;linkCode=as2&amp;creativeASIN=B075N1Z9LT&amp;linkId=d5000cca8ffa20f530b093293ea139e7">Synology DS918+</a> so that they appear as AirPlay devices in iOS! Normally you need the newer Sonos One for that.</p>

<p>The volume gets loud. I was able to turn it up well beyond the maximum comfortable listening volume. USB-C Power Delivery works like a champ!</p>

<iframe title="youtube" width="100%" height="396" src="https://www.youtube.com/embed/WeO31lAng2k" frameborder="0" allow="accelerometer; autoplay; encrypted-media; gyroscope; picture-in-picture" allowfullscreen=""></iframe>

<h4 id="thanks">Thanks:</h4>
<ul>
  <li><a href="https://jcallaghan.com/2016/11/battery-powered-portable-sonos-play1/">Battery powered portable Sonos Play:1 - James Callaghan</a></li>
  <li><a href="https://www.ifixit.com/Guide/Sonos+Play+1+Motherboard+Replacement/50818">Sonos Play 1 Motherboard Replacement - iFixit Repair Guide</a></li>
  <li><a href="https://www.reddit.com/r/sonos/comments/8kgzn9/painted_my_white_play1_so_its_actually_white/">Painted my white Play1 so it’s actually white - /u/Candlejaack</a></li>
</ul>]]></content><author><name>Wells Riley</name></author><category term="electronics" /><category term="guide" /><summary type="html"><![CDATA[I added a USB-C port to my Sonos Play:1 and powered it with a portable battery pack with USB-C Power Delivery]]></summary><media:thumbnail xmlns:media="http://search.yahoo.com/mrss/" url="https://wells.ee/images/2019-05-11-usb-c-sonos-hack/og.jpg" /><media:content medium="image" url="https://wells.ee/images/2019-05-11-usb-c-sonos-hack/og.jpg" xmlns:media="http://search.yahoo.com/mrss/" /></entry></feed>